
Live Chat!
SVX or Subaru Links
Old Lockers
Photo Post
How-To Documents
Message Archive
SVX Shop Search
|
SVX Network Forums Live Chat! SVX or Subaru Links Old Lockers Photo Post How-To Documents Message Archive SVX Shop Search |
IRC users: |
|
|
|
#1
 02-19-2009, 09:55 AM
|
||||
|
||||
|
Painting Engine Parts
So this summer I'm planning on taking my ?engine cover? (huge silver gray thing under hood) off and painting it semi gloss black with engine enamel. I'm just curious, what is under there? Are there any gaskets that will need to be replaced? or anything else?
Sorry i dont know all that much about cars just like to make mine look nice  Thanks I want to try and make it look something like this? 
__________________
-Jeremy- 1994 Barcelona Red LS 97,xxx miles Mods: - JVC Indash head unit, polk 6.5's, 6X9's, 2" tweeters, and 8" JL audio subwoofer run off of MA Audio M589I amp. Fiberglass Front splitters molded in, Shifted back stock spoiler, & repainted minor faded parts (Mirrors, rear quarter garnishes),18" murano 5-spoke wheels w/cooper zeon 2xs tires, '97 grille 
|
|
#2
02-19-2009, 11:55 AM
|
||||
|
||||
|
Re: Painting Engine Parts
The semi gloss black looks good. Best of luck with it.
Be careful taking off the manifold. It's a minefield under there. All the gear for the EGR stuff is there. Plus loads of metal pipes, plus two knock sensors. I think there may be wiring for the central torque control valve as well, and some of the fine pipes are rubber and tend to perish with the heat. If you damage one of these it will lose vacuum and run poorly. I would advise you to get a workshop manual and follow instructions carefully to remove it. It's not rocket science but there is potential for doing harm if you try taking things off in the wrong sequence. Joe
__________________
Black Betty [Bam a Lam!] '93 UK spec, still languishing Betty Jersey Girl Silver '92 UK [Channel Isles] 40K Jersey Girl @ Mersea Candy Purple Honda Blackbird Plum Dangerous White X2 RVR Mitsubishi 1800GDI. Vantastic 40,000 miles Jersey Girl 
|
|
#3
02-19-2009, 12:32 PM
|
||||
|
||||
|
Re: Painting Engine Parts
Quote:
 The intake on that car was sanded to remove all of the texture, and then painted with a high gloss paint. This was done by one of the previous owners. He also had painted all of the plastic garnish pieces chameleon, then the next owner sprayed the black you see over top of them, as they were not to his taste (or mine). You will encounter vaccum lines that may need replacing (a good idea to do while you have the area open) I would also suggest changing the PCV valve and cleaning the inside of the intake, as oil will occasionally build up.
__________________
1991 SVX L JDM
|
|
#4
02-19-2009, 01:51 PM
|
||||
|
||||
|
Re: Painting Engine Parts
Here is a picture with the intake removed:
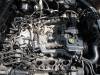 Click on thumbnail for larger picture in Album. Joe
__________________
Black Betty [Bam a Lam!] '93 UK spec, still languishing Betty Jersey Girl Silver '92 UK [Channel Isles] 40K Jersey Girl @ Mersea Candy Purple Honda Blackbird Plum Dangerous White X2 RVR Mitsubishi 1800GDI. Vantastic 40,000 miles Jersey Girl
|
|
#6
02-19-2009, 03:52 PM
|
||||
|
||||
|
Re: Painting Engine Parts
I could attempt a how to. hahah
So basically I have to... 1. Take all the bolts out (in the right order) 2. Be very careful taking it off. (?theres nothing connected to it at all?) 3. Paint it, 4. Put it back on very carefully being sure not to knock anything? Correct? Also does anyone know how hot the manifold gets? I got engine enamel and the can says it is resistant up to 500* Does the manifold get hotter than that? svxistentialist: Where could i find a workshop manual? Would i be able to find any diagrams online? Or could i go to a garage and they could find something in one of their programs?
__________________
-Jeremy- 1994 Barcelona Red LS 97,xxx miles Mods: - JVC Indash head unit, polk 6.5's, 6X9's, 2" tweeters, and 8" JL audio subwoofer run off of MA Audio M589I amp. Fiberglass Front splitters molded in, Shifted back stock spoiler, & repainted minor faded parts (Mirrors, rear quarter garnishes),18" murano 5-spoke wheels w/cooper zeon 2xs tires, '97 grille Last edited by Jeremy'sSVX; 02-19-2009 at 04:51 PM.
|
|
#7
02-19-2009, 05:31 PM
|
||||
|
||||
|
Re: Painting Engine Parts
There are several vacuum lines attached to it, and the EGR system. That's why you have to be a bit careful removing it.
I also haven't taken mine off, but I know the general idea. -Remove air intake tube from back of throttle body -Remove throttle body from intake manifold (this has it's own mess of vacuum and coolant lines. You may be able to simply remove it's bolts and pull it back a bit) -Disconnect EGR tube from intake. It's a metal pipe going into the right rear corner of the intake, probably under a square-ish metal shield. This may not go that easily, it does have exhaust gases flowing through it after all. -Remove bolts holding intake to fuel injector stacks -Start looking for vacuum lines to unplug. Get out your digital camera and take some pictures as you go so you'll remember where they go. These things get very brittle with age and heat, and may crack with even a gentle pull. If they do you'll need to replace them or the car will run like junk, or not at all. -Lift intake carefully, unplug stuff. Lift some more, unplug some more. Keep going till it's out. While it's out, replace your PCV valve. It will be about 300,000 times easier than with the intake in. You might also think about swapping the rear knock sensor with a new one. When you re-install you will need new gaskets for the manifold and throttle body.
__________________
Chris 92 Ebony Mica LS-L "A Rolling Restoration": 223,250 KM - Sleeping 2007 STi 6MT, Stance GR+ coilovers, PWR Rad, JDM hood badge, svxfiles 6000K HIDs, JDM Clear Corners, $15/15 min mod, $20/20 min mod, Energy Swaybar Bushings, Hella Supertones horns, Gold STi BBS rims, Group A lightweight crank pulley, A/C system removed, Custom header-back exhaust, Hybrid carbon/metal rear sway bar, restored headlights with CCFL halos 2008 Subaru Legacy Spec B - Diamond Grey Metallic - Sold 2020 Ram 1500 Longhorn - Red Pearl
|
 |
|
|


 Hybrid Mode
