
Live Chat!
SVX or Subaru Links
Old Lockers
Photo Post
How-To Documents
Message Archive
SVX Shop Search
|
SVX Network Forums Live Chat! SVX or Subaru Links Old Lockers Photo Post How-To Documents Message Archive SVX Shop Search |
IRC users: |
|
#1
 05-30-2010, 01:52 PM
|
||||
|
||||
|
Replace caliper, how?
Can anyone give me a straight forward how-to on replacing the rear caliper and flex hose? I think the hose is attached to a few attachment clips, but my main concerns are making sure there is no air in the lines.
I've never bled the brakes before but what are the steps in removing the caliper and hose and reassembly? Also do I have to remove the cap on the master cylinder reservoir during this process and does the bleeder screw need to be fully open when hooking up the new caliper? . Last edited by svxcess; 04-28-2019 at 05:06 PM. 
|
|
#2
05-30-2010, 04:54 PM
|
||||
|
||||
|
Re: Replace caliper, how?
.
I'm writing this off the top of my head, so if anyone notices something I've missed please post it. *Note: It may be a good idea to liberally spray your flex line/hard line connection with penetrating oil before getting to work. If that joint is seized and you break the hard line it's a whole new can of worms. Do not remove the master cylinder cap, it will allow the fluid to drain out faster, which is not what you want. REMOVING/INSTALLING THE CALIPER 1. Jack up the car, support with jack stands, remove the wheel, etc. 2. Use a brake line clamp to pinch the flex hose. (Do not use vise grips, there is a proper tool for this) 3. Disconnect the flex hose from the caliper 4. Remove the caliper (There are 2 bolts holding it to the knuckle. In many cases you don't even need to separate the caliper from its bracket, just pull the whole thing off as a unit) 5. Pop the brake pads out of caliper bracket if re-using. 6. Remove the 10mm bolt holding the flex hose to the strut. 7. Pull out the clip securing flex hose/hard line joint to the body of the car. 8. Using proper brake line wrenches, loosen the flex hose from the hard line. 9. Once the flex hose is loose and ready to be removed, make sure you have the new one close at hand. The goal here is to minimize fluid loss and chances of your master cylinder reservoir going empty. Remove the old line and attach the new one. Brake fluid will be leaking out while you're doing this. 10. Once the brake fluid is flowing freely from the flex line, clamp it off with the line clamp. 11. Install your new caliper bracket, pads, and caliper (reverse order of removal). 12. Attach the hose to the caliper. Make sure that you have both washers in place on either side of the hose fitting. Make sure the hose is straight and not twisted. Bolt the hose to the strut. Replace the clip at the flex/hard line joint. You now have an installed caliper with no fluid in it. Remove the line clamp and open the bleeder screw on the caliper. At this point you can take the cap off the master cylinder to encourage fluid flow. Keep an eye on both the master reservoir and the bleeder screw. You do not want to let the master cylinder run dry, so make sure to have an open bottle of brake fluid close at hand. Watch the fluid coming out of the bleeder. Let it drain until it is just fluid coming out, with no air bubbles. *Note: This is a good time to flush your brake fluid if it hasn't been done in a while. Open all 4 bleeders and let the fluid drain until it looks good and clean. BLEEDING THE BRAKES Now we get to bleed the brakes. A good gravity bleed (what we just did) should get you most of the way there. Now we're just making sure there aren't any pesky air bubbles trapped somewhere in the brake lines. You'll need a helper for this part. You shouldn't need to bleed the other 3 corners, as no air got in there. *Note: There are different techniques to bleeding brakes. I'll go with the one I normally use. Get your helper in the car and roll down the windows so he can hear you. 1. Open the bleeder screw (use the box end of the wrench and open the screw about 1/4 turn, leave the wrench on because you'll be closing it in a moment) and tell your helper to press down on the brake pedal in a smooth motion, about 2-3 seconds to push the pedal all the way down. (Not slamming it down). Ideally you want to shut the bleeder screw just before he hits the floorboard, since the sudden stop of pressure applied can draw a tiny air bubble back in. 2. With the bleeder screw closed, tell your helper to release the brake pedal. 3. Repeat steps 1 and 2 until you're sure there's no more air in the system. Depending on how long you gravity bleed the system you might not see any air bubbles at all. Go with at least 5 pumps for peace of mind. As before, make sure you don't empty the master cylinder. Jump in the car and pump up the brake pedal. It should develop pressure quickly. Put your wheels back on and take it out carefully for a test drive. .
__________________
Chris 92 Ebony Mica LS-L "A Rolling Restoration": 223,250 KM - Sleeping 2007 STi 6MT, Stance GR+ coilovers, PWR Rad, JDM hood badge, svxfiles 6000K HIDs, JDM Clear Corners, $15/15 min mod, $20/20 min mod, Energy Swaybar Bushings, Hella Supertones horns, Gold STi BBS rims, Group A lightweight crank pulley, A/C system removed, Custom header-back exhaust, Hybrid carbon/metal rear sway bar, restored headlights with CCFL halos 2008 Subaru Legacy Spec B - Diamond Grey Metallic - Sold 2020 Ram 1500 Longhorn - Red Pearl Last edited by svxcess; 04-28-2019 at 05:07 PM.
|
|
#3
05-30-2010, 06:12 PM
|
||||
|
||||
|
Re: Replace caliper, how?
Let me ask you if the brake fluid was recently replaced (not by me), do I need to bleed the brakes or can I do as you say open the bleeder only on the new caliper I am installing and add fluid as needed to the MC?
Very descriptive write up, thank you!
|
|
#4
05-30-2010, 06:15 PM
|
||||
|
||||
|
Re: Replace caliper, how?
If that's the case than you can omit the flush and just worry about the one caliper.
It's something I encourage people to do as much as they can, since brake fluid is hydroscopic and will absorb moisture out of the air over it's life. This moisture in turn accelerates the rusting of your brakes lines, as well as giving you a garbage pedal. However, most cars go their entire lives without a proper flush and suffer no gravely ill effects.
__________________
Chris 92 Ebony Mica LS-L "A Rolling Restoration": 223,250 KM - Sleeping 2007 STi 6MT, Stance GR+ coilovers, PWR Rad, JDM hood badge, svxfiles 6000K HIDs, JDM Clear Corners, $15/15 min mod, $20/20 min mod, Energy Swaybar Bushings, Hella Supertones horns, Gold STi BBS rims, Group A lightweight crank pulley, A/C system removed, Custom header-back exhaust, Hybrid carbon/metal rear sway bar, restored headlights with CCFL halos 2008 Subaru Legacy Spec B - Diamond Grey Metallic - Sold 2020 Ram 1500 Longhorn - Red Pearl Last edited by svxcess; 04-28-2019 at 12:30 PM.
|
|
#5
05-30-2010, 08:50 PM
|
||||
|
||||
|
Re: Replace caliper, how?
can I ask what type of flex hose clamp to get if pliers are not recommended to be used? I'm searching, but still unsure what to purchase
|
|
#6
05-31-2010, 06:49 AM
|
||||
|
||||
|
Re: Replace caliper, how?
Quote:
http://www.svxnation.com/1992-1997-s...ake-lines.html I would also STRONGLY recommend investing in a tubing wrench (6 point) to disconnect the flex line from the car hard line. It's a brass nut and very easy to round the corners without the proper tool. I bought my set at O'Reilly's for less than $20 for an 8 different size set. Lee
__________________
SVXx2 92 SVX LS-L Silver 92 SVX LS-L Burgundy (structurally challenged with 2792 miles) 96 SVX LSi Red 92 SVX LS Pearl (Parts) 01 F150 4X4 Red (+6 with other members of the family) FREEDOM IS NOT FREE Last edited by svxcess; 04-28-2019 at 12:36 PM.
|
|
#7
05-31-2010, 04:44 PM
|
||||
|
||||
|
Re: Replace caliper, how?
There are different types of line clamps available. Here is the ones I use:
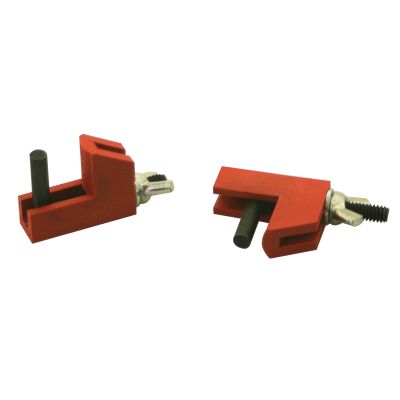 Another variant: 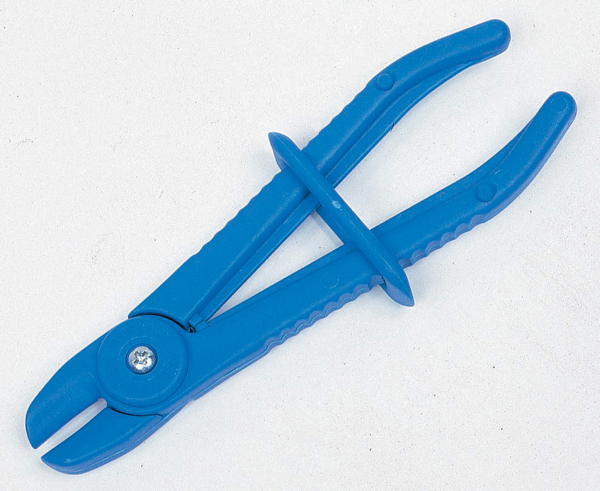 You local parts/tools store should be able to set you up with something. They're cheap.
__________________
Chris 92 Ebony Mica LS-L "A Rolling Restoration": 223,250 KM - Sleeping 2007 STi 6MT, Stance GR+ coilovers, PWR Rad, JDM hood badge, svxfiles 6000K HIDs, JDM Clear Corners, $15/15 min mod, $20/20 min mod, Energy Swaybar Bushings, Hella Supertones horns, Gold STi BBS rims, Group A lightweight crank pulley, A/C system removed, Custom header-back exhaust, Hybrid carbon/metal rear sway bar, restored headlights with CCFL halos 2008 Subaru Legacy Spec B - Diamond Grey Metallic - Sold 2020 Ram 1500 Longhorn - Red Pearl
|
|
#9
05-31-2010, 06:00 PM
|
||||
|
||||
|
Re: Replace caliper, how?
10mm.....................for the nut to remove the hose behind the caliper
__________________
Seth 94' Barcelona Red w/ Tricoat black 2-tone AWD Ls -Sold Mods:AWD conversion/4.44 swap by Budfreak, Custom red interior lights, Custom Satin black dash, Power mode switch, Cold air intake, Permecool tranny filter,Sony xplode 10" sub, Sony xplode 1000w amp, Blitz in-line driver, DDM Tuning 6000k HID's, New paint job/body work by me, 97' Grill, QC shift kit, 17'' MB Motoring rims, 15&20 min mod, front & rear urethane swaybar bushings, Custom fiberglass sub box, Custom red led a/c control unit, perrin lightweight crank pulley, Black wrinkle finish powdercoated intake manifold w/ clear hoses , 02' outback heated/power black leather seats Soon to come:Fiberglass hood, upholster ALL suede to black leather Past subies: 92' Pearl White/black top LS-L-SOLD 96' Legacy Outback-TOTALED 99' Legacy Outback Limited 30th anniversary edition-TOTALED 98' Forester L -Totaled Other toys: 99' Forester S -WRX brake upgrade, soon an 04 wrx motor swap 06' B9 Tribeca-Stock 1982' Yamaha xj650 Maxim Mods: work in progress
|
|
#11
04-28-2019, 12:54 PM
|
||||
|
||||
|
Re: Replace caliper, how?
.
I found this simple method to work perfectly and allows you to bleed the brakes by yourself, without the aid of a helper. Or just have the helper help looking at the hose until all the bubbles are gone. And this is hack is particularly ingenious... .
__________________
. Subaru Ambassador 1996 Polo Green LSi #216..138,100 miles...SOLD JFICX8659TH100216.....Date of Manufacture: November 16, 1995..... Fuji Heavy Industries..Ōta North Plant....Ōta City,. Gunma Prefecture, Japan In-Service Date: January 2, 1997 "The Pristine Green Polo Machine First Polo Green on the Network First Clear front turn signals, JDM Alcyone hood emblem, rear panel, and BOXER engine cover on the Network (US) (2000) First 5000K HID factory fog lights (2007) First SVX JDM BBS wheels on a USDM SVX (2013) HID lighting (5000K) for headlight and H3 fog lights, PIAA SuperExtreme 120W high beams, rebuilt EG33 longblock, Cometic head gaskets, Phase II flexplate, AMR aluminum radiator with custom silicone hoses, 160A high-output alternator in aluminum-ceramic coated case, new design alternator wiring upgrade v.4, rare factory headlight protectors, refinished JDM BBS mesh aluminum wheels and custom, polished billet aluminum new hex center caps, LED grille mod, R1 Concepts high-carbon cryo slotted rotors, Akebono ceramic pads, Goodridge S/S braided brake lines, Smallcar Stage 1 shift kit, ThermalTech aluminum/ceramic-coated valve covers, Energy Suspension urethane front & rear swaybar bushings, Bontrager22 rear swaybar with QS Components Chromoly Teflon/Kevlar endlinks, "$15.00/5 minute" suspension mod. Hella Supertone horns, Custom stainless steel exhaust system with 2" headpipes, Magnaflow cats, AeroTurbine AR25 resonator /AWD "Bullet" muffler. R.I.P. 2010 Subaru Outback Limited 2.5 CVT...338,000 miles. Totaled by a 1,300 lb. COW March 4, 2016  2014 Hyundai Avante Limited ...178,000 miles. Actually quieter and smoother than the Outback  2007 Mazda Miata MX-5 PRHT...102,000 miles. Plenty of parts, service and windshields.  4th Registered Network member 2/21/2001 My NEW locker..I...My Email..I..Wikipedia/SVX . . Last edited by svxcess; 05-04-2019 at 05:06 PM.
|
|
#12
04-28-2019, 01:15 PM
|
||||
|
||||
|
Re: Replace caliper, how?
Also, when replacing a caliper, be sure to clean off and lubricate the caliper slide pins or just buy new ones if they are damaged or corroded.
.
__________________
. Subaru Ambassador 1996 Polo Green LSi #216..138,100 miles...SOLD JFICX8659TH100216.....Date of Manufacture: November 16, 1995..... Fuji Heavy Industries..Ōta North Plant....Ōta City,. Gunma Prefecture, Japan In-Service Date: January 2, 1997 "The Pristine Green Polo Machine First Polo Green on the Network First Clear front turn signals, JDM Alcyone hood emblem, rear panel, and BOXER engine cover on the Network (US) (2000) First 5000K HID factory fog lights (2007) First SVX JDM BBS wheels on a USDM SVX (2013) HID lighting (5000K) for headlight and H3 fog lights, PIAA SuperExtreme 120W high beams, rebuilt EG33 longblock, Cometic head gaskets, Phase II flexplate, AMR aluminum radiator with custom silicone hoses, 160A high-output alternator in aluminum-ceramic coated case, new design alternator wiring upgrade v.4, rare factory headlight protectors, refinished JDM BBS mesh aluminum wheels and custom, polished billet aluminum new hex center caps, LED grille mod, R1 Concepts high-carbon cryo slotted rotors, Akebono ceramic pads, Goodridge S/S braided brake lines, Smallcar Stage 1 shift kit, ThermalTech aluminum/ceramic-coated valve covers, Energy Suspension urethane front & rear swaybar bushings, Bontrager22 rear swaybar with QS Components Chromoly Teflon/Kevlar endlinks, "$15.00/5 minute" suspension mod. Hella Supertone horns, Custom stainless steel exhaust system with 2" headpipes, Magnaflow cats, AeroTurbine AR25 resonator /AWD "Bullet" muffler. R.I.P. 2010 Subaru Outback Limited 2.5 CVT...338,000 miles. Totaled by a 1,300 lb. COW March 4, 2016 2014 Hyundai Avante Limited ...178,000 miles. Actually quieter and smoother than the Outback 2007 Mazda Miata MX-5 PRHT...102,000 miles. Plenty of parts, service and windshields. 4th Registered Network member 2/21/2001 My NEW locker..I...My Email..I..Wikipedia/SVX . .
|
 |
| Thread Tools | |
| Display Modes | |
|
|


 Linear Mode

