
Live Chat!
SVX or Subaru Links
Old Lockers
Photo Post
How-To Documents
Message Archive
SVX Shop Search
|
SVX Network Forums Live Chat! SVX or Subaru Links Old Lockers Photo Post How-To Documents Message Archive SVX Shop Search |
IRC users: |
|
#1
 03-23-2006, 01:25 PM
|
||||
|
||||
|
How-To: Turbocharge an SVX with pictures (long)
Well thanks to Bobby, i got around to writing up a general framework for turbocharging an svx(atleast the way in which my car is setup). I will add pictures to it later, im hoping someone would be willing to let me have a webpage that i can put all this up on(and edited, i just wrote it all up and im sick of reading/thinking about it!)
let me give you a general breakdown here of what i did and in the order. As you get more specific in your needs ill go into more detail. Feel free to install the walbro fuel pump at any point, Longassname has a nice writeup with pictures in the blower thread  time to start ripping stuff out! i removed teh airbox,  snorkel, EGR,  water tank(you may want to use a smaller tank and retain them in a different location, i ditched them for now). remove the exhaust ,i cut mine off a few inches from the headers, then took off the flanges and ground them down flat to weld the new piping onto(you could make your own flanges if you want).  work then started on the up pipe. brought both around and up, being sure to make sure there would be enough room for engine movement.  Be especially aware of the power steering rack boots and the axle boot, and leave room to squeeze the downpipe into the space on the passenger side next to the transmission.  The two up pipes meet just before the engine pay compartment, and go to one pipe that goes over. 
__________________
~Phil Teal 1992 Subaru SVX Turbo - Sold in May 2011 to peace-frog. |
|
#2
03-23-2006, 01:26 PM
|
||||
|
||||
|
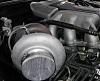
after mocking up the up pipe(just tacing it) the turbo was placed and the flange was tac'd.
 make sure to leave room for the oil return hose under the turbo to come straight out, you dont want a 90 right off the turbo on the return. also, make sure the turbo is level as possible(bearing housing wise) use a bubble level on the up-pipe flange to be sure. you want the waste gate to be at the point at which the two up pipes meet(if you go external wg) make sure you not only tac it in place, dont even cut the convergence until you are 100% certain of its placement.  look at the WG piping to make sure its not contacting anything, you want to leave run for a turndown on the dump of the waste gate, so you dont blow exhaust all over something that will melt. 4) time to start working on the downpipe. Put the flange on the turbine housing and start mocking up the piping with the turbo bolted down to the downpipe flange sitting in the car.  it is also time to start moving a lot of the harness' for the engine. They can be moved fairly easily, by either pulling and ziptieing or by unbolting them from their position and just tucking them away. Time to do the intercooler piping. Remove the bumper cover from the car, placing it to the side. Unbolt the actual bumper via the 2 big bolts that bolt it down on the passenger and driver side engine bay(you need the battery out anyways so remove it) With it still on the car hold your intercooler up and pull out the trusty sharpie and mark up where you are going to need to cut it to make the intercooler fit(I suppose you could cut it straight off, but I dont like cutting anymore of the bumper off then need be) get the good old torch/plasma cutter out bumper off the car. Make sure you have LOTS of gas for this, its a pita and takes a long time to cut through all the layers.
__________________
~Phil Teal 1992 Subaru SVX Turbo - Sold in May 2011 to peace-frog. |
|
#3
03-23-2006, 01:26 PM
|
||||
|
||||
|
• With the piece cut, smooth it out with the grinding wheel/dremel/whatever you want so that its not all rigid and nasty. Put the bumper back on the car and tac the intercooler up so that you can see how it will fit.
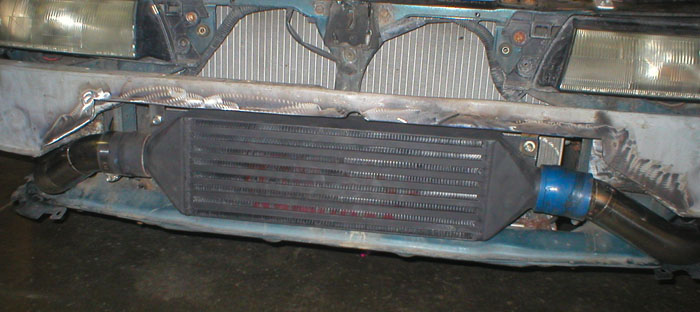 Also, time to see how much of the bumper cover you will need to cut. I did not use the foam inserts, but you may want to cut them as well to make them fit. Cut the bumper cover and place it on making sure everything fits. 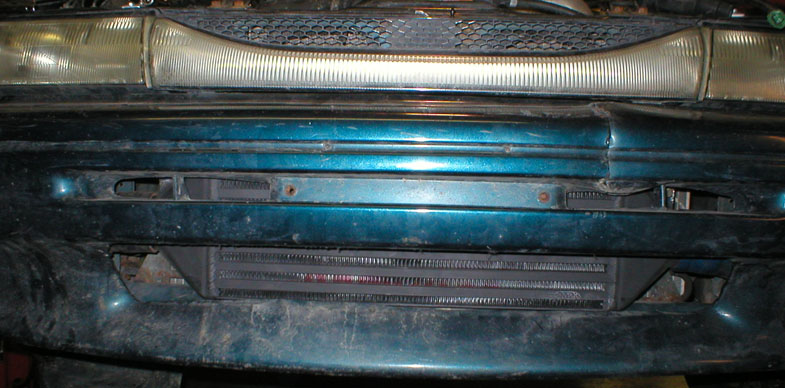 • Now with the ic mounted, time to start on the intercooler piping. Mark and cut the hole in the engine bay for the intercooler piping coming off the turbo with a zawzall or air cutter, which will lead go into front of the fenderwell. Make sure to leave room in the fender-well for the air intake, maf, and various pre-boost vacuum hoses as well., so make this pipe hug close to the engine bay until it gets a good distance down. Curve it up and around to the intercooler.  From the other side, I chose to bring the piping around to run up in the fender,well and right next to the fusebox sawzalling the hole after you have made the piece. 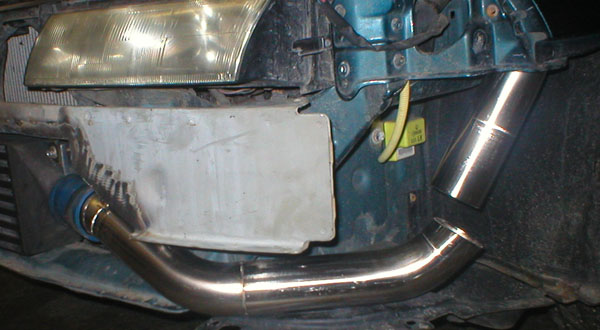 This way any standard Honda battery would(hopefully at the time lol) fit in the engine bay still. Sure enough it all fit, and now you don’t have to worry about weather it will or wont. 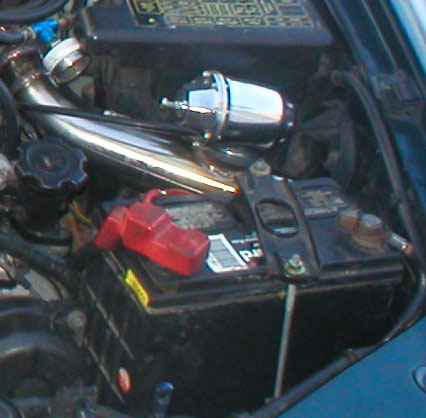 Note, if you keep ac you may find it harder but you shold be able to run a Honda battery. So far I have not had any problems with it not starting or etc, I just carry jumper cables just in case but im sure you could get an expensive high Cold cranking amp battery if your worried about it. Putting the battery in the trunk was another option, and the original idea. But I didn’t feel like rewiring and running a junction box, and if you plan on racing you need to have some sort of remote shutoff, not to mention an expensive sealed battery. • Take your BOV flange and cut out and tac it down right next to the fusebox and battery, as seen in the above picture, or wherever you want it guess but this seemed the logical place for me(and Sam) to put it.
__________________
~Phil Teal 1992 Subaru SVX Turbo - Sold in May 2011 to peace-frog. Last edited by Phast SVX; 03-23-2006 at 01:31 PM. |
|
#4
03-23-2006, 01:27 PM
|
||||
|
||||
|
Making the plenum adapter for the throttlebodies is kind of up to you. I chose to run a 2.5 to 3 reducer to a 3 plenum with 2, 2.5piping, or you could use velocity stacks into the 3". Tac everything up make sure its good and solid.
 I made the intake piping as well, cutting a new hole out of where the original one was, your going to have to run a few pre-boost vacuums into here(pcv and iac) so make sure drill a tap into them somewhere so now that every is in and tacked lets take it all off, making sure that it will not move around and is tac'd properly.     Time to block off the bottom EGR port, and put the top EGR port In the manifold to good use. I tapped it, and used it to run my vacuum sources off of. You could also use the allen head plug on the risers if you wanted(where the break booster is only on the passenger side riser) We made a nice adapter box to plug a bunch of NPT fittings into and run all the vacuum hoses into, to keep it nice and clean.
__________________
~Phil Teal 1992 Subaru SVX Turbo - Sold in May 2011 to peace-frog. |
|
#5
03-23-2006, 01:27 PM
|
||||
|
||||
|
With everything out for finish welding, there is lots of space. Remove the 3 coil packs on the side and take them out of the car. I extended them a few inches by soldering them up VERY WELL, and ran them up and under the intake manifold, so to not have any chance of them being melted or exposed to extreme heat. I believe i added about 3 inches, but just to be safe run them up through and look at how much you need to add to them to make them reach. Also remove the PCV hosing at this time, as youll need to run new hose into the fenderwell , I met them and then ran one hose down. Also this is a good time to run the Idle air control hose into the fender as well, making sure to leave plenty of slack for error.
Extend and rewire in your z32 MAF adapter to the fender-well, leaving plenty of room, thank god for ECUtune, they make this project possible. Heat wrap your brake lines running to the ABS unit with 1200f heat wrap or whatever you choose to use. It needs to be shielded. Run the maf wires under those, making sure they are nicely shielded from heat. Time for more fun. Raise the car up and remove the oil pan, making sure you keep track of all bolts. Clean off the stock gasket sealer off the block and the pan, and nows a good time to take everything off and clean it nicely with parts cleaner. Once clean, cut the hole for the return adapter, and bolts. Weld the bolts into the pan so that you can tighten them with the pan on if need be. The return should be at the top, and may block one of the oil pan bolts if your not carefull. Make sure that when you install the pan and the adapter you use gasketsealer. With everything back from welding its time to fit the up pipe, weld in the o2 bungs, and make sure everything fits like it did. Most likely it will, but I had to slightly modify the downpipe and the wg piping, it happens, welding is extremely hot and can cuase metal to pull. Install the wastegate and make sure its all tight and happy with some room. With the header, wastegate, and turndown for WG on, fit the turbo and gasket, align and tighten the scroll onto the bearing housing in positon. Now its time to run the return line for the oil to the pan, and also the feed line to the greddy oil filter adapter pour a little oil into the feed and turn the wheel a little to get it a little prelubed.. I used -3an feed line and -10an return line in my setup so that I did not have to run a reducer, if you run larger you will most likely have to as it will be WAY to much oil, our block pushes up to 90 psi of OP. Time to heatwrap the header!(yeah that means out it coes again!) Make sure to not use more ethan a ¼ overlap, and get the sealer with the header wrap. If wrapped properly it sholdnt cuase a lot of damage fast, but be aware that header wrap will reduce the life of the piping. Its just not an option in my setup, and I will see how it goes and address the problem if it arises. So far its completely fine though. Fit it bac up once you are done, with gasket sealer/ gaskets. Fit the downpipe, weld in an 02 bung if your running a wideband(more than 18 from the turbo), remove and heatwrap the portion in the engine bay and down some, and install again, along with the rest of the exhaust if you have made it.  Install the intake onto the turbo install your newly made vacuum adapter for said pre-boost needing items.
__________________
~Phil Teal 1992 Subaru SVX Turbo - Sold in May 2011 to peace-frog. |
|
#6
03-23-2006, 01:28 PM
|
||||
|
||||
|
Install intercooler piping, and make sure all the couplers are tight. Install your bov and make sure its tight, any gaskets or snap-rings are tight. Yes tight tight! We dont want any boost leaks anywhere now do we.
Install the vortech RRFRP. Right now im running a 7:1 disc and it is running about 12:1 on full boost through the rev range. Make sure yo dont hook it up backwards, as it will not allow any fuel to return and the car will not run(long). You iinstall it into the return side fue line, i took the existing line and fed it to the rrfpr, and ran a new one to the hardpipe.  Install the 02s and any other random things we may have that need to be reinstalled. Your getting close and ancy at this point but do not resinstalled the bumper cover(bolt the metal bumper down though) make sure everything is connected and that nobody is forgotten here or there. Now you have installed your gauges in the downtime I hope, and you (I hope) have a wideband and boost guage installed to monitor things  . Put oil in the car, hook up the battery, and turn the engine over a few times to get some oil into the system before you start it up. Time to start it for the first time, monitor the AFR while its sitting there idling. If you turn the key, and it starts and wont stay running check your maf wiring. If it starts going lean you most likely have a vacuum leak somewhere, so check everywhere for leaks. Watch it idle, it should be around 12-16 just idling on startup, and will waver slightly around that area, dropping down to 14s and 15s. Give it a few revs and see how it handles that, not large ones but just some throttle and watch the AFR. For your first small test drive keep the bumper off the car incase you need to adjust hoses. Have a buddy watch your air fuel and boost and take it around to make sure everything is dandy and not going lean, you want to stay in the 11-12afr range on full throttle/boost  . From here on out bolt the bumper cover back on, make sure nothing has melted/started to melt and nothing is out of the ordinary... .and you get the idea 
__________________
~Phil Teal 1992 Subaru SVX Turbo - Sold in May 2011 to peace-frog. |
|
#7
03-27-2006, 09:08 PM
|
|||
|
|||
|
I moved this to the how-to section and deleted all of the other posts at Phil's request.
 Mike |
|
|


 Linear Mode

