
Live Chat!
SVX or Subaru Links
Old Lockers
Photo Post
How-To Documents
Message Archive
SVX Shop Search
|
SVX Network Forums Live Chat! SVX or Subaru Links Old Lockers Photo Post How-To Documents Message Archive SVX Shop Search |
IRC users: |
|
#1
 09-09-2008, 09:30 PM
|
||||
|
||||
|
In depth How-To requested
I just read a thread with some basic instructions on body work. I thought it was great, but it also was very basic.
I am assuming there must be someone here that is experienced with paint and body. So, I am asking for an SVX Idiots guide to paint and body. Money is tight and I am assuming I can do a better job than Macco if time is not limited even if money is. Any experienced persons willing to do some write ups with photos?
__________________
-- Chris Founder/Administrator SVX World Network ECU Tune (stage 1), PWR (prototype aluminum radiator) Amateur Radio - General Class - K7SVX #1 92 Teal LSl 246k (Dedicated SVX Race Car, now with 4.44 speed) #2 92 Teal LSl 125k (Retired, car rescued from a field of weeds) 2007 Impreza 2.5i Special Edition, Obsidian Black Pearl (Daily driver) 2001 Dodge Ram 2500 quad cab, Cummins turbo diesel 4x4 (race car & RV hauler) 1985 Honda VF500 Interceptor (fair weather fun commuter) Going on 11 years of NHRA bracket racing NHRA Div 6 Car/Driver # T654 (site being rebuilt, new name is www.teamsvxracing.com) 2000 1st Place Club Challenge Series 2002 3rd Place Season Track Champion, Import Racing (Firebird Raceway) 2003 4th Place Season Track Champion, Import Racing (Firebird Raceway) 2003 1st Place NW Regional Import Shootout (July 5th) 2004 1st Place Club Challenge #1 (Firebird Raceway) 2004 1st Place NHRA "King of the Track" race 2004 NHRA Gold Cup 2nd place season win 2004 Import/Sport Compact 3rd place season win 2004 Division 6 Summit/ET NHRA Race of Champions finalist competitor (Mission, BC) 2007 1st Place Import Survival #3 2007 1st Place Track Champion Import Summer Jam (Wild Street Class) 2007 1st Place Import Survival #5 2008 Club season 1st place win, Club Champion 2008 2nd Place Season Import Final. 2008 Division 6 Summit/ET NHRA Import Finals (Woodburn, Or) 2009 2nd Place Import Summer Jam (Wild Street Class) 2010 1st Place Club race #2 - 1st place Sport Compact race #1 & #2 
|
|
#2
09-09-2008, 10:01 PM
|
||||
|
||||
|
Re: In depth How-To requested
Quote:
tom
|
|
#3
09-09-2008, 11:39 PM
|
||||
|
||||
|
Re: In depth How-To requested
Most excellent. Even if he does not have production capabilities, if he provides content, I can work with Earl to finalize the presentation. I am sure there are other SVXWN members that have pondered popping a dent, or fixing some paint, yet all the weird unknowns like filler, hardener, HVLP, etc... has boggled their minds. Or am I the only one?

__________________
-- Chris Founder/Administrator SVX World Network ECU Tune (stage 1), PWR (prototype aluminum radiator) Amateur Radio - General Class - K7SVX #1 92 Teal LSl 246k (Dedicated SVX Race Car, now with 4.44 speed) #2 92 Teal LSl 125k (Retired, car rescued from a field of weeds) 2007 Impreza 2.5i Special Edition, Obsidian Black Pearl (Daily driver) 2001 Dodge Ram 2500 quad cab, Cummins turbo diesel 4x4 (race car & RV hauler) 1985 Honda VF500 Interceptor (fair weather fun commuter) Going on 11 years of NHRA bracket racing NHRA Div 6 Car/Driver # T654 (site being rebuilt, new name is www.teamsvxracing.com) 2000 1st Place Club Challenge Series 2002 3rd Place Season Track Champion, Import Racing (Firebird Raceway) 2003 4th Place Season Track Champion, Import Racing (Firebird Raceway) 2003 1st Place NW Regional Import Shootout (July 5th) 2004 1st Place Club Challenge #1 (Firebird Raceway) 2004 1st Place NHRA "King of the Track" race 2004 NHRA Gold Cup 2nd place season win 2004 Import/Sport Compact 3rd place season win 2004 Division 6 Summit/ET NHRA Race of Champions finalist competitor (Mission, BC) 2007 1st Place Import Survival #3 2007 1st Place Track Champion Import Summer Jam (Wild Street Class) 2007 1st Place Import Survival #5 2008 Club season 1st place win, Club Champion 2008 2nd Place Season Import Final. 2008 Division 6 Summit/ET NHRA Import Finals (Woodburn, Or) 2009 2nd Place Import Summer Jam (Wild Street Class) 2010 1st Place Club race #2 - 1st place Sport Compact race #1 & #2
|
|
#4
09-10-2008, 04:05 PM
|
||||
|
||||
|
Re: In depth How-To requested
I can help with this also since it's my trade. I have some PPG papers I can download on how to do dents, primer and prep.
__________________
Seth 94' Barcelona Red w/ Tricoat black 2-tone AWD Ls -Sold Mods:AWD conversion/4.44 swap by Budfreak, Custom red interior lights, Custom Satin black dash, Power mode switch, Cold air intake, Permecool tranny filter,Sony xplode 10" sub, Sony xplode 1000w amp, Blitz in-line driver, DDM Tuning 6000k HID's, New paint job/body work by me, 97' Grill, QC shift kit, 17'' MB Motoring rims, 15&20 min mod, front & rear urethane swaybar bushings, Custom fiberglass sub box, Custom red led a/c control unit, perrin lightweight crank pulley, Black wrinkle finish powdercoated intake manifold w/ clear hoses , 02' outback heated/power black leather seats Soon to come:Fiberglass hood, upholster ALL suede to black leather Past subies: 92' Pearl White/black top LS-L-SOLD 96' Legacy Outback-TOTALED 99' Legacy Outback Limited 30th anniversary edition-TOTALED 98' Forester L -Totaled Other toys: 99' Forester S -WRX brake upgrade, soon an 04 wrx motor swap 06' B9 Tribeca-Stock 1982' Yamaha xj650 Maxim Mods: work in progress
|
|
#5
09-10-2008, 05:40 PM
|
||||
|
||||
|
Re: In depth How-To requested
+1 on this - please!
Am trying to do some touch-ups and repaint the front bumper... and yup, well and truly boggled. Lots of reading, trial and error and making a couple of spots worse before better has taught me a few things, but... Tania. Edit: I do have some Subaru docs on repairing/repainting plastic bits to add to content if they're wanted - they're good, just assume a level of knowledge/experience I don't have. Another Edit: Chris, its the first time I've come accross you in a thread - many, many thanks for a great site.
__________________
1992 Onyx SVX 184,500kms Now with new and improved no leak steering! No plants = no life on earth - so go forth and plant green things! Last edited by plantchick; 09-10-2008 at 05:45 PM.
|
|
#6
09-10-2008, 06:52 PM
|
||||
|
||||
|
Re: In depth How-To requested
Here are some PPG data sheets I have. This is for more of the deeper/rusty things on the car you are fixing.
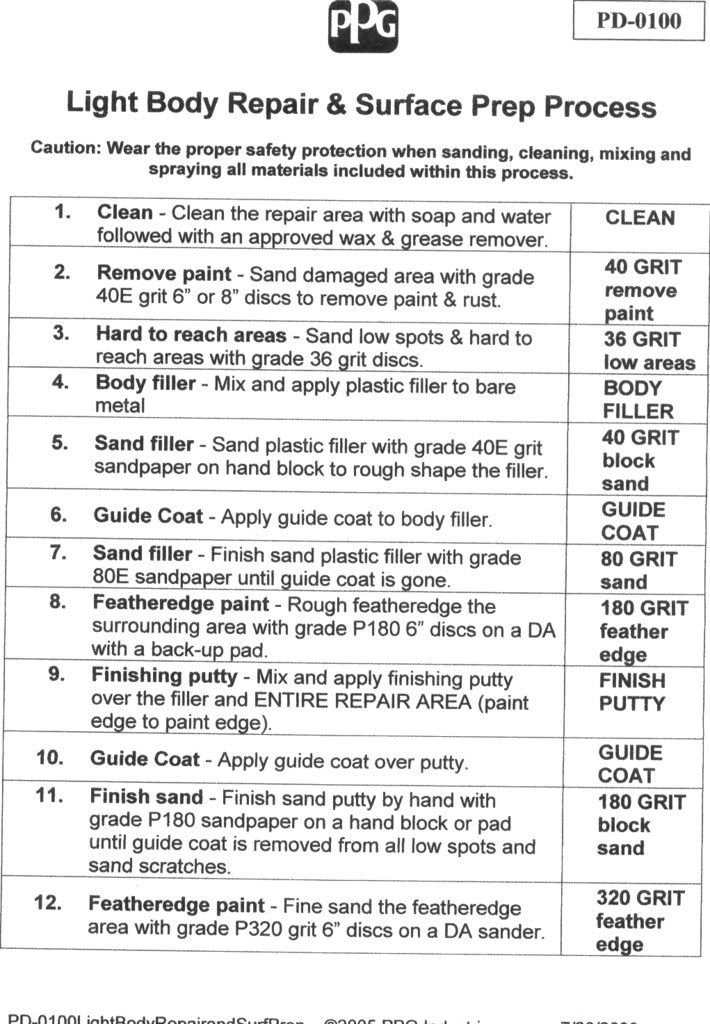 Most dents that are very shallow and less than the size of a silver dollar can be fix easily without much work. Directions: 1) Sand the damaged area with 80grit sandpaper just enogh to rough up the surface but not enought to go down to the metal, about a hands width all around the area 2) Apply a glazing putty such as USC ICING PUTTY. Apply the glaze side-to-side and up-down motion until the area is covered. Cover the whole area that has the 80grit scratches. 3) Spray some GUIDE COAT over the area you just applied putty to. 4) Next use some 180grit sandpaper on a block (autozone or advance auto sells 3M blocks) and sand it left-to-right, up-down, and diagonally about a hands width past the 80grit scratches untill the guide coat doesn't show anymore. Also double check with your hand every which way to see if their still are high or low spots. 5) Guide coat one more time and sand a hands width past the 180grit scratches with some 320grit. 6) Now your ready for primer!!! 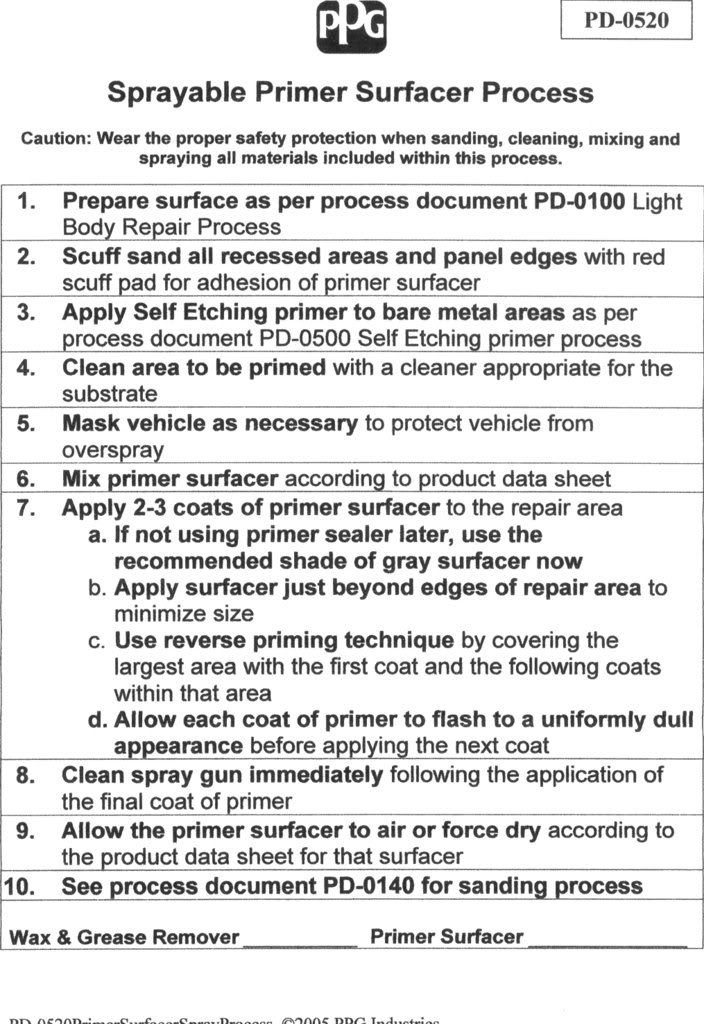 Here's another sheet on how to sand the primer after you applied it. When sanding the primer I myself always use 400grit wet on my first sanding, then go over it again with 600grit wet. When I say wet I mean get a bottle of soapy water and use sandpaper that's made to be wet and keep the primer area wet while you sand. 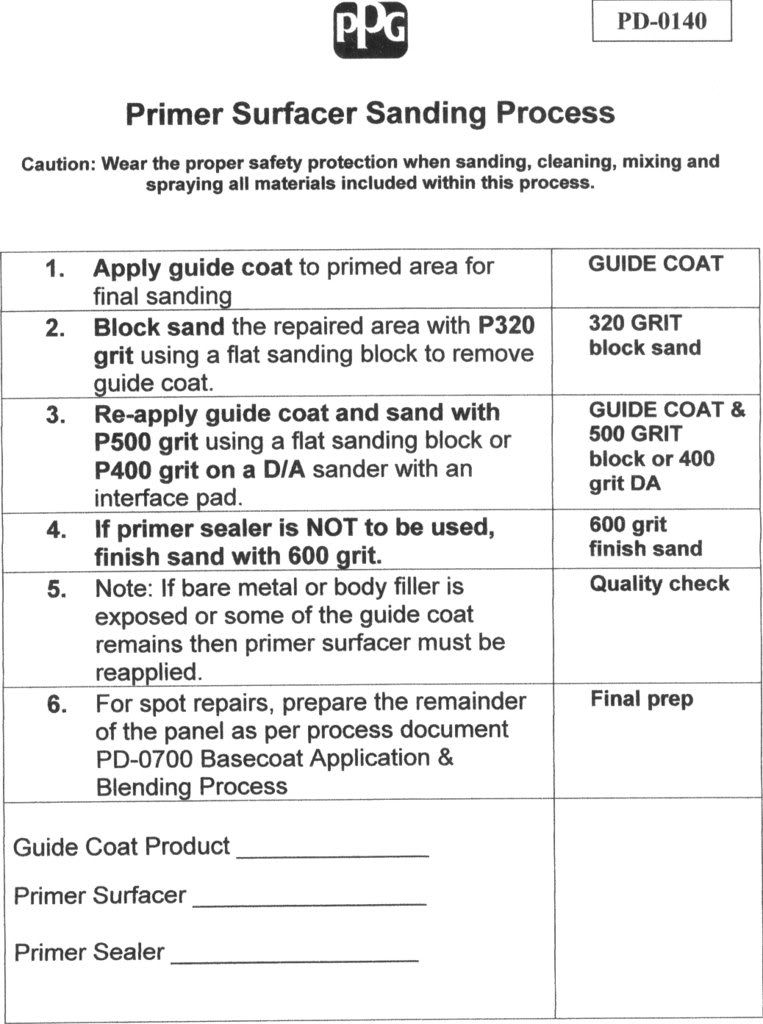 Preping panels for paint: When preping a panel for paint I use 800grit on a DA (Dual Action Sander), then I use a grey scuff pad over the whole area I just sanded. Then I use a scuffing paste PPG makes with a grey scuff pad and go over the area once again. NOTE: ALWAYS< ALWAYS< ALWAYS scuff the edges or your clear coat might chip away/ not get good adheasion, and don't break through the clear coat or you'll have to prime that spot and sand it because if you don't it might lift(not stick) when you apply base coat. New panels: When you have lets say a fender,hood,door or whatever and its ready for paint you must do a few things befor you put them back on the car. Directions: 1) For new panels sand with 220grit on a DA, then use a red scuff pad over the whole thing. For primed panels just go straight to step 2. 2) Apply 2 coats of primer sealer to the whole thing 3) Next apply 2 coats of the base coat that you are applying to the car 4) After they are dry sand the panel with 800grit wet and use a grey scuff pad wet with some scuffing paste over the sand scratches. Don't sand the paint off just sand it smooth. The panel should be dull if done good. 5) apply back on the car and tape it up for paint. I also took some photos of some steps because I was doing a little body work before I wrote this. I'll try and post them up this week. If anyone has questions feel free to ask.
__________________
Seth 94' Barcelona Red w/ Tricoat black 2-tone AWD Ls -Sold Mods:AWD conversion/4.44 swap by Budfreak, Custom red interior lights, Custom Satin black dash, Power mode switch, Cold air intake, Permecool tranny filter,Sony xplode 10" sub, Sony xplode 1000w amp, Blitz in-line driver, DDM Tuning 6000k HID's, New paint job/body work by me, 97' Grill, QC shift kit, 17'' MB Motoring rims, 15&20 min mod, front & rear urethane swaybar bushings, Custom fiberglass sub box, Custom red led a/c control unit, perrin lightweight crank pulley, Black wrinkle finish powdercoated intake manifold w/ clear hoses , 02' outback heated/power black leather seats Soon to come:Fiberglass hood, upholster ALL suede to black leather Past subies: 92' Pearl White/black top LS-L-SOLD 96' Legacy Outback-TOTALED 99' Legacy Outback Limited 30th anniversary edition-TOTALED 98' Forester L -Totaled Other toys: 99' Forester S -WRX brake upgrade, soon an 04 wrx motor swap 06' B9 Tribeca-Stock 1982' Yamaha xj650 Maxim Mods: work in progress Last edited by redlightningsvx; 09-10-2008 at 09:14 PM.
|
|
#7
09-10-2008, 09:52 PM
|
||||
|
||||
|
Re: In depth How-To requested
Most excellent. That is an awesome start. Thank you.
__________________
-- Chris Founder/Administrator SVX World Network ECU Tune (stage 1), PWR (prototype aluminum radiator) Amateur Radio - General Class - K7SVX #1 92 Teal LSl 246k (Dedicated SVX Race Car, now with 4.44 speed) #2 92 Teal LSl 125k (Retired, car rescued from a field of weeds) 2007 Impreza 2.5i Special Edition, Obsidian Black Pearl (Daily driver) 2001 Dodge Ram 2500 quad cab, Cummins turbo diesel 4x4 (race car & RV hauler) 1985 Honda VF500 Interceptor (fair weather fun commuter) Going on 11 years of NHRA bracket racing NHRA Div 6 Car/Driver # T654 (site being rebuilt, new name is www.teamsvxracing.com) 2000 1st Place Club Challenge Series 2002 3rd Place Season Track Champion, Import Racing (Firebird Raceway) 2003 4th Place Season Track Champion, Import Racing (Firebird Raceway) 2003 1st Place NW Regional Import Shootout (July 5th) 2004 1st Place Club Challenge #1 (Firebird Raceway) 2004 1st Place NHRA "King of the Track" race 2004 NHRA Gold Cup 2nd place season win 2004 Import/Sport Compact 3rd place season win 2004 Division 6 Summit/ET NHRA Race of Champions finalist competitor (Mission, BC) 2007 1st Place Import Survival #3 2007 1st Place Track Champion Import Summer Jam (Wild Street Class) 2007 1st Place Import Survival #5 2008 Club season 1st place win, Club Champion 2008 2nd Place Season Import Final. 2008 Division 6 Summit/ET NHRA Import Finals (Woodburn, Or) 2009 2nd Place Import Summer Jam (Wild Street Class) 2010 1st Place Club race #2 - 1st place Sport Compact race #1 & #2
|
|
#8
09-11-2008, 03:06 AM
|
||||
|
||||
|
Re: In depth How-To requested
These are the US WSM files on repairs. Sorry, I don't have the full Adobe suite on this computer, so can't compile them. I've uploaded them in numerical order, if they're opened that way pages will be consecutive. Some of it is similar to what redlightning has posted, but there's also stuff specific to the PP bumpers and removal of panels/parts. There's more on removing panels/trim if anyone wants something specific.
The last few & paint codes are in the next post.
__________________
1992 Onyx SVX 184,500kms Now with new and improved no leak steering! No plants = no life on earth - so go forth and plant green things! Last edited by plantchick; 09-11-2008 at 03:52 AM.
|
|
#9
09-11-2008, 03:15 AM
|
||||
|
||||
|
Re: In depth How-To requested
I did post the paint codes elsewhere a couple of days ago, but thought it might be useful to have them here.
Tania.
__________________
1992 Onyx SVX 184,500kms Now with new and improved no leak steering! No plants = no life on earth - so go forth and plant green things!
|
|
#10
09-11-2008, 04:14 AM
|
||||
|
||||
|
Re: In depth How-To requested
Quote:
 Quote:
Then..... If I do get the guts to try for the whole door panel, is there a way to paint the very edge (where the usal opening scrapes are) without having to remove the door? Also, would you have the spot repair document mentioned? (PD 0700) Thanks in advance, Tania.
__________________
1992 Onyx SVX 184,500kms Now with new and improved no leak steering! No plants = no life on earth - so go forth and plant green things!
|
|
#11
09-11-2008, 12:47 PM
|
|||
|
|||
|
Re: In depth How-To requested
Tania,
That's great stuff. Somewhere in the past, one of the POs repainted the pearl on my '92 pearlie, but didn't touch the black. The pearl has some issues, especially around the edges, but the clear coat on the black is shot. I'm trying to sand the remains of the clear off, so that I can make the black look shiny until the time I can have the whole car repainted. All that info you posted helps when I'm working in the alley behind my garage. Thanks, Paul
__________________
The great white fleet: '91 Alfa Romeo 164L 5-speed '92 Subaru SVX LSL '93 Mercury (Aussie) Capri
|
|
#12
09-11-2008, 03:47 PM
|
||||
|
||||
|
Re: In depth How-To requested
those FSM pages on body work are OUTDATED!!!!! Just use them for how to remove panels and use my sheets above for how to sand body work. Ill post more later.
__________________
Seth 94' Barcelona Red w/ Tricoat black 2-tone AWD Ls -Sold Mods:AWD conversion/4.44 swap by Budfreak, Custom red interior lights, Custom Satin black dash, Power mode switch, Cold air intake, Permecool tranny filter,Sony xplode 10" sub, Sony xplode 1000w amp, Blitz in-line driver, DDM Tuning 6000k HID's, New paint job/body work by me, 97' Grill, QC shift kit, 17'' MB Motoring rims, 15&20 min mod, front & rear urethane swaybar bushings, Custom fiberglass sub box, Custom red led a/c control unit, perrin lightweight crank pulley, Black wrinkle finish powdercoated intake manifold w/ clear hoses , 02' outback heated/power black leather seats Soon to come:Fiberglass hood, upholster ALL suede to black leather Past subies: 92' Pearl White/black top LS-L-SOLD 96' Legacy Outback-TOTALED 99' Legacy Outback Limited 30th anniversary edition-TOTALED 98' Forester L -Totaled Other toys: 99' Forester S -WRX brake upgrade, soon an 04 wrx motor swap 06' B9 Tribeca-Stock 1982' Yamaha xj650 Maxim Mods: work in progress
|
|
#13
09-11-2008, 04:00 PM
|
||||
|
||||
|
Re: In depth How-To requested
Sorry, was just trying to be helpful. If you think any should be removed, tell me and I will. Like I said, I'm a learner.
__________________
1992 Onyx SVX 184,500kms Now with new and improved no leak steering! No plants = no life on earth - so go forth and plant green things!
|
|
#14
09-11-2008, 05:43 PM
|
||||
|
||||
|
Re: In depth How-To requested
Check this out,
http://www.baa-direct.com/ This guy does motorcycles but his lessons can be applied to just about anything.... his free course (yes, it's completely free NSA) walks you through everything you could want to know about getting a paint job right.... he goes through everything slowly too.... by that I mean his course is loooooonnnggg..... but not without reason... he also sets you up with the 'right' tools.... not the over priced ones... the ones that get the job done without breaking the bank... The 'lessons' that will be sent to you via link in an Email seem long but at the end of them you will NOT regret the information...
|
|
#15
09-11-2008, 05:55 PM
|
||||
|
||||
|
Re: In depth How-To requested
Quote:
__________________
Seth 94' Barcelona Red w/ Tricoat black 2-tone AWD Ls -Sold Mods:AWD conversion/4.44 swap by Budfreak, Custom red interior lights, Custom Satin black dash, Power mode switch, Cold air intake, Permecool tranny filter,Sony xplode 10" sub, Sony xplode 1000w amp, Blitz in-line driver, DDM Tuning 6000k HID's, New paint job/body work by me, 97' Grill, QC shift kit, 17'' MB Motoring rims, 15&20 min mod, front & rear urethane swaybar bushings, Custom fiberglass sub box, Custom red led a/c control unit, perrin lightweight crank pulley, Black wrinkle finish powdercoated intake manifold w/ clear hoses , 02' outback heated/power black leather seats Soon to come:Fiberglass hood, upholster ALL suede to black leather Past subies: 92' Pearl White/black top LS-L-SOLD 96' Legacy Outback-TOTALED 99' Legacy Outback Limited 30th anniversary edition-TOTALED 98' Forester L -Totaled Other toys: 99' Forester S -WRX brake upgrade, soon an 04 wrx motor swap 06' B9 Tribeca-Stock 1982' Yamaha xj650 Maxim Mods: work in progress
|
 |
| Thread Tools | |
| Display Modes | |
|
|


 Linear Mode

