
Live Chat!
SVX or Subaru Links
Old Lockers
Photo Post
How-To Documents
Message Archive
SVX Shop Search
|
SVX Network Forums Live Chat! SVX or Subaru Links Old Lockers Photo Post How-To Documents Message Archive SVX Shop Search |
IRC users: |
|
#91
 10-02-2011, 11:49 AM
|
||||
|
||||
|
CLARIFICATION: New Alternator Wiring Upgrade Configuration
.
I need to make a major clarification in the alternator wiring configuration installation. No changes to the actual wiring setup, just the connectors. Questions posted and PMs I have received are mostly about problems with the connectors on the ends of the power and ground wires. Although ring terminals were not mentioned in the article, the assumption was made to use standard ring terminals like these: I only used the kind shown above in two places. One is where the ground cable from the NEG battery terminal connected to the horn bracket. It was more flexible and easier to install down there. The second is on the end of the ground wire which attaches to the A/C bracket. For the 4 gauge power wire from the POS battery terminal to the alternator (and to and from the MegaFuse) I used 4 gauge copper battery lugs.  For the 4 gauge ground connection at the A/C bracket, I used a regular 4 gauge ring terminal (but you could use a battery lug if desired). This wire is not really carrying current, just providing the ground path. Battery lugs are solid copper and resist the tendency to heat up and are sturdy. I believe they come in 2 different hole diameters, 5/16" and 3/8". I used the 5/16" at the alternator connection, with just a little filing around the outside to fit. The offset allows the hug to seat into the alternator firmly while raising the alternator wire higher. I used battery lugs at the MegaFuse connections as well. For the 4 gauge ground connection at the A/C bracket, I used used a regular 4 gauge ring terminal (but you could use a battery lug if desired). 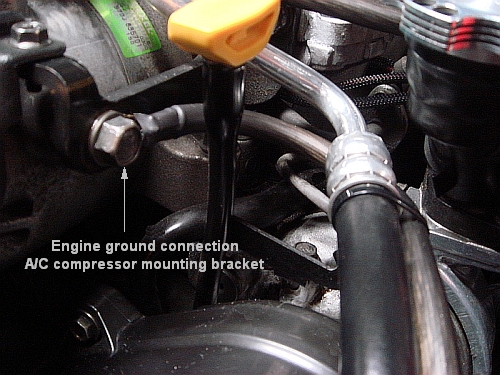 These battery lugs are very inexpensive and can be found at most auto parts stores or battery shops. Buy 4 of each size to be sure. I am sorry for the confusion, I have done so many modifications over the years, I neglected to mention this change. I thought the photos would be enough. Unlike ring terminals, the battery lugs are designed to efficiently pass high currents and were sturdy enough to be trimmed in size without sacrificing surface area and strength. I will take better photos of EACH connection and add it to the published upgrade. .
__________________
. Subaru Ambassador 1996 Polo Green LSi #216..138,100 miles...SOLD JFICX8659TH100216.....Date of Manufacture: November 16, 1995..... Fuji Heavy Industries..Ōta North Plant....Ōta City,. Gunma Prefecture, Japan In-Service Date: January 2, 1997 "The Pristine Green Polo Machine First Polo Green on the Network First Clear front turn signals, JDM Alcyone hood emblem, rear panel, and BOXER engine cover on the Network (US) (2000) First 5000K HID factory fog lights (2007) First SVX JDM BBS wheels on a USDM SVX (2013) HID lighting (5000K) for headlight and H3 fog lights, PIAA SuperExtreme 120W high beams, rebuilt EG33 longblock, Cometic head gaskets, Phase II flexplate, AMR aluminum radiator with custom silicone hoses, 160A high-output alternator in aluminum-ceramic coated case, new design alternator wiring upgrade v.4, rare factory headlight protectors, refinished JDM BBS mesh aluminum wheels and custom, polished billet aluminum new hex center caps, LED grille mod, R1 Concepts high-carbon cryo slotted rotors, Akebono ceramic pads, Goodridge S/S braided brake lines, Smallcar Stage 1 shift kit, ThermalTech aluminum/ceramic-coated valve covers, Energy Suspension urethane front & rear swaybar bushings, Bontrager22 rear swaybar with QS Components Chromoly Teflon/Kevlar endlinks, "$15.00/5 minute" suspension mod. Hella Supertone horns, Custom stainless steel exhaust system with 2" headpipes, Magnaflow cats, AeroTurbine AR25 resonator /AWD "Bullet" muffler. R.I.P. 2010 Subaru Outback Limited 2.5 CVT...338,000 miles. Totaled by a 1,300 lb. COW March 4, 2016  2014 Hyundai Avante Limited ...178,000 miles. Actually quieter and smoother than the Outback  2007 Mazda Miata MX-5 PRHT...102,000 miles. Plenty of parts, service and windshields.  4th Registered Network member 2/21/2001 My NEW locker..I...My Email..I..Wikipedia/SVX . . Last edited by svxcess; 01-05-2019 at 03:18 PM. 
|
|
#92
10-02-2011, 12:41 PM
|
||||
|
||||
|
Re: New Alternator Wiring Upgrade Configuration
The ring terminals work just fine for me! But thanks for the clarification. I plan on redoing it in a month or so with those.
Thanks for your help!
|
|
#93
10-02-2011, 09:02 PM
|
||||
|
||||
|
Re: New Alternator Wiring Upgrade Configuration
i used lugs the whole way through, napa had them in difference hold dia

__________________
Tranny goes in, tranny comes out, tranny goes in.....AW ****, tranny comes out....
|
|
#94
04-02-2016, 05:31 PM
|
||||
|
||||
|
Re: New Alternator Wiring Upgrade Configuration
Just adding my SVX to the list with this mod, minus the alternator itself. I was working on something else and found my battery was dying. Went to replace and decided to upgrade to an Optima and that snowballed. I found my ground wire slightly short and didn't want to splice on an extension so:
Replaced ground wire from rear of motor, replaced power wire from starter, alternator wires as in this thread mod, battery hold down. I don't really like shiny polished metal but this was the third hold down I bought and didn't want to return another one. It, actually, looks okay for what I thought would be too blingy. Major thanks to Svxcess for detailed information and patient assistance via messages. My results aren't quite as pretty but not bad; it's a bit tidier than stock as the rewiring of the wiring harness to rear of motor allowed me to tuck the wires tightly to the top of the frame.
|
 |
| Thread Tools | |
| Display Modes | |
|
|


 Linear Mode

