
Live Chat!
SVX or Subaru Links
Old Lockers
Photo Post
How-To Documents
Message Archive
SVX Shop Search
|
SVX Network Forums Live Chat! SVX or Subaru Links Old Lockers Photo Post How-To Documents Message Archive SVX Shop Search |
IRC users: |
|
#1
 12-04-2007, 12:18 PM
|
||||
|
||||
|
Expensive OEM pars blah blah blah...
So I called up Subaru over here to ask the price of the hood and trunk struts and got quoted as 98.56 each for the front, and 58.27 each for the rear.
Thats about 300 just for gas shocks to keep my hood and trunk supported up. Then I said "I work for Toyota (same town), can you work with me on a price?" He said yes, but to my surprise he offered 20% off  I think I'll save this for my wheel bearings or axles when I need them. Or maybe, MAYBE when I'm ready we could do a small group buy of smal odds and ends we need and I'll buy in bulk for all of us. Keep in mind this is a huge maybe cause we will have to figure the cost of things we want to buy at the normal discount being offered as well as a bulk buy discount if applicable, as well as shipping to your location. I'll keep you all informed in the future. the end
__________________
Mike 1992 SVX LS-L Pearl White 102,000 miles (Gone) 2005 Evolution 8 SSL Tarmac Black (new daily) 1995 Eclipse GSX Durango Copper Pearl (teh beast) 276awhp/280awtq @ 18psi (560's inj) 260awhp/260awtq @ 17psi (stock inj) 
|
|
#2
12-04-2007, 12:31 PM
|
|||
|
|||
|
I too need my struts replaced and got a quote from Subaru at $250 installed. Not worth it to me when a FG hood costs $350...
Two options to think about in the meantime: 1) Canadian Tire/local hardware/auto shop struts can work. Post here about Probe struts that work ($30 a piece). I think our extended length is 18.5", compressed around 10.5". http://www.subaru-svx.net/forum/show...dian+tire+hood 2) Rob (LetitSnow) has in his sig a link to SPD hardware that sells gas struts for $15 a piece. He also mentioned that he may be fabricating a kit for the group. http://www.spdhardware.com/catalog/l...-C52741324413} Hope this helps.
__________________
Ben 92 Graphite LS-L Touring (136k miles) #4143 5 speed, ACT clutch, Sparco R-Speed shortshifter, Ecutune v1, Stebro exhaust, PWR rad, 18" Motegi Racing FF15 wheels wrapped in Falken Azenis, Alpine 9833 MP3/CD with Alpine 3ways in front, MSW G-lateral drop springs, ss braided brake lines, d/s rotors, 9005 headlight mod, Celcius mod  92 Ebony LS-L Touring (125k miles) #7328 smallcar shift kit, Panasonic MP3/CD, Remote starter with security For Sale: http://www.subaru-svx.net/forum/show...370#post501370 92 Claret LS-L Touring (Sold - 1998) The first car I ever drove.
|
|
#3
12-04-2007, 12:47 PM
|
||||
|
||||
|
I'm looking around for a local shop that will put together some brackets for teh cheap. If I can come up with one, I can release a fully functional, aesthetically pleasing, complete package that will allow the replacement of the struts with common shelf struts. I know it's been a long time that I've had this on the shelf, but I'm digging in now. I'll letcha know.
__________________
Disclaimer: The above post is on the internet.
|
|
#4
12-04-2007, 12:50 PM
|
|||
|
|||
|
I ordered some from McMaster for around 18 bucks a pop not that long ago. There is a how to that gives you details on doing your struts, along w/ some part numbers.
__________________
"They that can give up essential liberty to obtain a little temporary safety deserve neither liberty nor safety." Benjamin Franklin blk 92' LSL w/ average mods pics here http://s306.photobucket.com/albums/nn277/yourconfused/ Cash68: "Hmm, I wouldn't brag about beating Escorts. That's like saying you tricked a retarded person."
|
|
#6
12-04-2007, 01:08 PM
|
|||
|
|||
|
Quote:
But then there's the matter of shipping... dcb
|
|
#7
12-04-2007, 03:17 PM
|
|||
|
|||
|
I am curious to see what plug and play looks like.
__________________
"They that can give up essential liberty to obtain a little temporary safety deserve neither liberty nor safety." Benjamin Franklin blk 92' LSL w/ average mods pics here http://s306.photobucket.com/albums/nn277/yourconfused/ Cash68: "Hmm, I wouldn't brag about beating Escorts. That's like saying you tricked a retarded person."
|
|
#8
12-04-2007, 03:42 PM
|
||||
|
||||
|
svxcuseme did a write-up on his replacement struts he bought from Autozone or some place like that, I'll search for the thread.
Hood strut redo How-To Hood strut redo part 2
__________________
bLAh
Last edited by 94SubieSVX; 12-04-2007 at 03:45 PM.
|
|
#9
12-04-2007, 03:50 PM
|
|||
|
|||
|
That write up is what I was referring to in the how-to comment. I went in to Napa, AZ and Advanced with the how-to printed up as a reference and was unable to cross reference the part numbers with anything those stores sold. Of course I have also met employees at these stores that could not spell simple parts like head light or solenoid...
__________________
"They that can give up essential liberty to obtain a little temporary safety deserve neither liberty nor safety." Benjamin Franklin blk 92' LSL w/ average mods pics here http://s306.photobucket.com/albums/nn277/yourconfused/ Cash68: "Hmm, I wouldn't brag about beating Escorts. That's like saying you tricked a retarded person." Last edited by YourConfused; 12-04-2007 at 03:53 PM.
|
|
#10
12-04-2007, 04:24 PM
|
||||
|
||||
|
I have more pictures from in-process, but here's the result...
The original writeup suggests removing the ball from the top of the factory strut. I found this to be more trouble than it's worth; I replaced them with a standard pair of ball studs. No muss, no fuss. 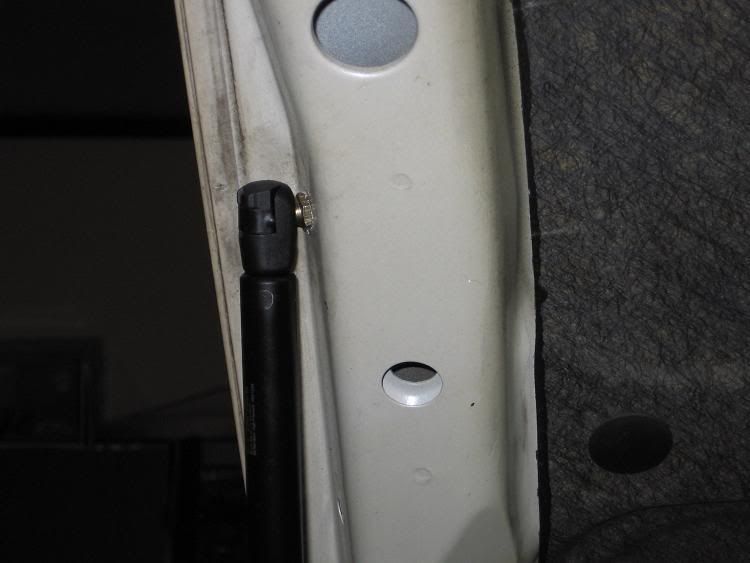 The original writeup and John's technique both involve keeping the hinged bit that was originally attached to the strut. The way I did it, there are no cut or altered pieces retained, and you can go ahead and paint the whole thing without working around a pivot if you choose. It also eliminates what I see as a somewhat clumsy connection, between the bracket and the hinged piece at the end of the strut. I simply removed all of the strut that wasn't bolted to the fender! The hole was too large for the ball stud that I had intended to use, so I placed a washer inside it. The overlap from the nut and the ball stud hex covered it with room to spare to hold them in place. I've got some acorn nuts that I'm going to replace the current ones with, just for aesthetics. 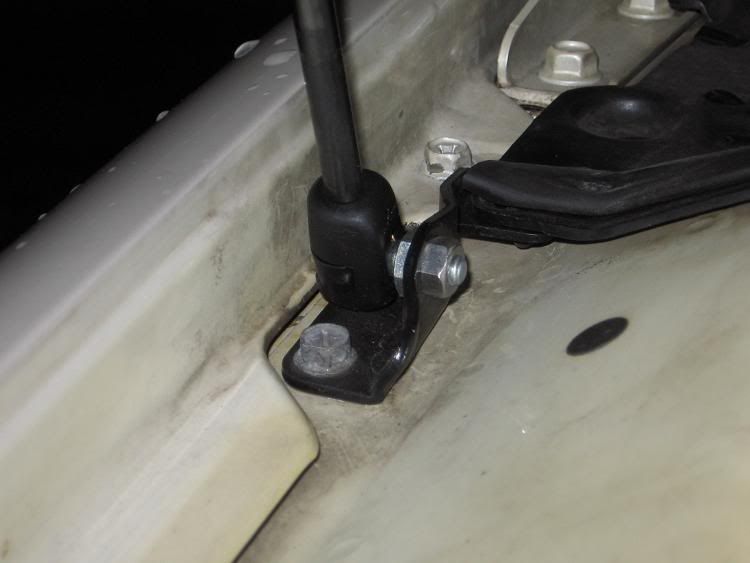 The crowd cries foul! That's not plug 'n' play! Well, in this method, no. You wind up cutting the one joint out. The alternate would be to replace the lower brackets with something custom, which wouldn't have any of the funky bends required by the stock setup. That's probably more than most people would want to go through, unless they were into the custom bits... anodized this and that, but that's what it would take. All told, this plan eliminates all bladework, save for one cut which doesn't physically influence anything left on the car. Wha'cha think?
__________________
Disclaimer: The above post is on the internet. Last edited by LetItSnow; 12-12-2007 at 07:16 PM.
|
|
#11
12-04-2007, 04:59 PM
|
||||
|
||||
|
Quote:
")
|
|
#12
12-04-2007, 05:31 PM
|
||||
|
||||
|
Quote:
__________________
92 SVX LS Pearl 94 SVX LSi Barcelona Red 82 Brat 4WD Bob
|
|
#13
12-04-2007, 05:54 PM
|
||||
|
||||
|
I'm not sure if the trunk ones came out as well. They make a difference to me, but I'm told that they should probably work better than they do. Again, we come back to the "mechanical disadvantage" of the hingework... I've got to do some homework on how that thing all goes. I've got access to Unigraphics, which lets me do some neat things, so I might be able to work something out that has better performance than the current (installed in my car) design.
__________________
Disclaimer: The above post is on the internet.
|
|
#14
04-14-2008, 07:37 AM
|
||||
|
||||
|
Quote:
My modification was very similar to LetItSnow's. The NAPA gas-charged struts are 11" long (closed) with about a 6" stroke. They are rated at 90lbs. of force. Your NAPA parts guy can look up the P/N for you with just these specs. After propping the hood open with a piece of wooden dowel or a broomstick,take off the old hood struts by unscrewing the two bolts where the bottom bracket attaches to the fender. Then unscrew the ball stud from the hood and take out the entire bracket/strut assembly. Using a hacksaw or a Dremel, cut the shaft of the strut from the original bracket at the point where the two connect.  As with LetItSnow's procedure, I also purchased a ball stud from NAPA (I believe it was 8mm) to use at the hood mounting point. I added a washer and a rubber washer as well to prevent metal-to-metal contact. If you pry back the black metal clip on the strut mount, the ball stud will slide in and then release the clip to lock it. [CENTER]  This is where we differ in our approach to the bottom bracket. In the How-To document, the strut shaft is cut off at the base of the bracket and ground flat. In step 4, a 7/32" hole the size of the threaded shaft is drilled in the bottom bracket, the threaded shaft is inserted through the hole in the bracket and held in place by a nut. I found that a much better way is to drill a slightly smaller hole in the bracket and thread it 1/4" x 28 pitch (the same threads as in the strut shaft). After you unscrew the black cap on the bottom of the new struts, you can then thread the bottom of the strut shaft into the bracket until it stops. This makes it much stronger and gets rid of any free play. You can then further secure it with a nut on the other side (not shown)  In true "svxcess" fashion, I color-matched the brackets to my paint and secured them to the fender using polished stainless steel button head allen bolts.   The easiest way to install them is: ...1) attach the new ball stud into the hood. ...2) Attach the modified bottom bracket back onto the fender. ...3) Screw the bottom of the strut shaft completely into the threaded bottom bracket and secure with a nut. ...4. Adjust the top mounting point of the strut by turning the threaded cap as necessary to line up with the ball stud on the hood. What I like about this approach to the bottom bracket modification is that it allows for the hood to open to the same height as stock. In LetItSnow's, the bottom attaching point is lower and the hood doesn't open quite as much. .
__________________
. Subaru Ambassador 1996 Polo Green LSi #216..138,100 miles...SOLD JFICX8659TH100216.....Date of Manufacture: November 16, 1995..... Fuji Heavy Industries..Ōta North Plant....Ōta City,. Gunma Prefecture, Japan In-Service Date: January 2, 1997 "The Pristine Green Polo Machine First Polo Green on the Network First Clear front turn signals, JDM Alcyone hood emblem, rear panel, and BOXER engine cover on the Network (US) (2000) First 5000K HID factory fog lights (2007) First SVX JDM BBS wheels on a USDM SVX (2013) HID lighting (5000K) for headlight and H3 fog lights, PIAA SuperExtreme 120W high beams, rebuilt EG33 longblock, Cometic head gaskets, Phase II flexplate, AMR aluminum radiator with custom silicone hoses, 160A high-output alternator in aluminum-ceramic coated case, new design alternator wiring upgrade v.4, rare factory headlight protectors, refinished JDM BBS mesh aluminum wheels and custom, polished billet aluminum new hex center caps, LED grille mod, R1 Concepts high-carbon cryo slotted rotors, Akebono ceramic pads, Goodridge S/S braided brake lines, Smallcar Stage 1 shift kit, ThermalTech aluminum/ceramic-coated valve covers, Energy Suspension urethane front & rear swaybar bushings, Bontrager22 rear swaybar with QS Components Chromoly Teflon/Kevlar endlinks, "$15.00/5 minute" suspension mod. Hella Supertone horns, Custom stainless steel exhaust system with 2" headpipes, Magnaflow cats, AeroTurbine AR25 resonator /AWD "Bullet" muffler. R.I.P. 2010 Subaru Outback Limited 2.5 CVT...338,000 miles. Totaled by a 1,300 lb. COW March 4, 2016  2014 Hyundai Avante Limited ...178,000 miles. Actually quieter and smoother than the Outback 2007 Mazda Miata MX-5 PRHT...102,000 miles. Plenty of parts, service and windshields.  4th Registered Network member 2/21/2001 My NEW locker..I...My Email..I..Wikipedia/SVX . . Last edited by svxcess; 04-15-2008 at 07:47 AM.
|
|
#15
04-14-2008, 08:44 AM
|
||||
|
||||
|
Quote:
* No drillin'. * No tappin'. * No hinge means access to 100% of the surface area of the bracket for paintin'. * The replacement strut I use is about an inch longer than spec. I'll see you at stock height. 
__________________
Disclaimer: The above post is on the internet.
|
 |
|
|


 Linear Mode

