
Live Chat!
SVX or Subaru Links
Old Lockers
Photo Post
How-To Documents
Message Archive
SVX Shop Search
|
SVX Network Forums Live Chat! SVX or Subaru Links Old Lockers Photo Post How-To Documents Message Archive SVX Shop Search |
IRC users: |
|
|
|
#1
 03-29-2006, 08:43 PM
|
|||
|
|||
|
Valve Cover Gaskets: How to?
I searched the threads for em and found bits and pieces, but not a complete explanation on how to do it other than 'remove 3 coil packs' and 10 bolts, but I need more info as i'm less mechanically gifted than you all (Although i'm sure I can do it with proper instruction) If anyone can please help I would be eternally grateful: Can you give me a step by step procedure like those How-To documents? What is a coil pack and how do I remove it safely? What are some things I need to be very careful about? How do I remove/install the gaskets? Can I get a complete part # list?
I know that you remove 10 bolts or what not... But got confused as to exactly how to take out the gasket and how to secure the cover as you unbolt it (its a small space in there) Any tips and help will be appreciated!!! 
|
|
#2
03-30-2006, 08:01 AM
|
||||
|
||||
|
I will be replacing the valve cover seals on AmazonParrot's SVX later this Spring and may do a How-To...but that obviosuly doesn't help you right now.
A quick and dirty how-to is as follows (going from memory as I no longer own an SVX): (Note - I recommend that you change your oil immediately after doing the valve cover seals as dust, pollen, etc can get into your engine when replacing the seals. If you can, do the swap indoors) 1) Disconnect the battery and remove entirely 2) Remove the airbox, MAF and inlet tube You'll now have a lot of room to work with on both sides...  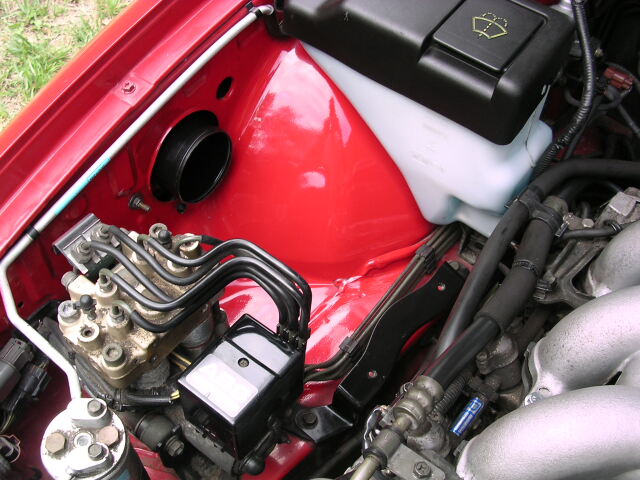 3) Unbolt the engine oil filler tube 4) Unbolt the three coil packs per side of the EG33 (get them out of the way) 5) Undo the ten bolts that hold each valve cover on  6) The valve cover should come right off, if not pry gently 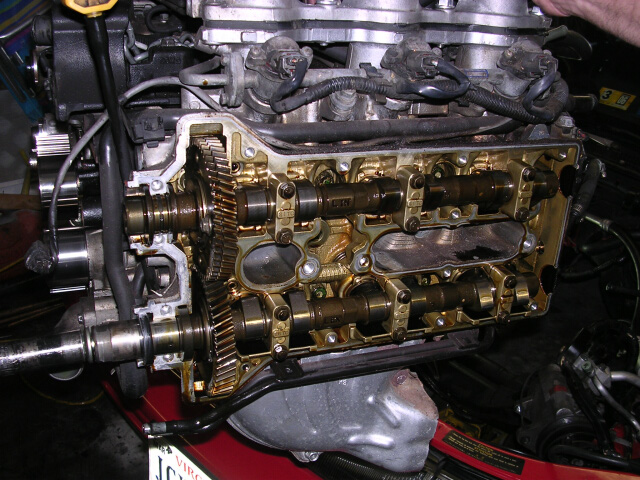 7) Take the actual valve cover over to a bench and remove the three rubber seals - they're relatively easily to remove (one goes all around and the other two go around the middle area where the coil packs sit). 8) Take your new seals and replace. Note that the seals are specific to one side of the engine. Don't force the new seals down into the little grooves, but push them in there gently (if rubber is damaged during installation, seal will fail) 9) Replace valve covers and 10 bolts per side (someone chime in here with the torque specs on these bolts - I think it's around 10-14 ft-lbs) 10) Replace coil packs and oil filler tube 11) Replace air tube, MAF, airbox and battery -Chike
__________________
"Wise men talk because they have something to say; fools, because they have to say something." - Plato 2013 Cosmic Blue 5spd Evo X GSR 2006 Galaxy Gray 6MT RX-8 (sold) 2006 Steel Gray WRX TR (sold) 1996 Brilliant Red SVX L (sold)
|
|
#3
03-30-2006, 08:52 AM
|
||||
|
||||
|
These prices are from www.Subaruparts.com. Good prices and fast delivery.
Hope this helps for a parts list. Steve
__________________
92 SVX AWD 130,000 w/ rebuilt SVX 4.11  97 Audi A4 1.8T (Daily Driver) 03 Ford Expedition(hers) SVXepidia SVX information warehouse Are you in? My Old Locker A 4.11 Founding Father "Tranny #6" I really need a manual  Reading IX [SIGPIC][/SIGPIC] Ya I was there
|
|
#4
03-30-2006, 09:33 AM
|
||||
|
||||
|
That's a very good quick how-to.....can we expect this to spill or trickle oil all over the place upon removing the covers...assuming we keep our engines in the car? I've never done one myself
|
|
#5
03-30-2006, 10:46 AM
|
||||
|
||||
|
Quote:
On a scale of 1-10 (10 being the hardest), I'd rate this job a 5. Trickiest part is maneuvering your wrench around to remove the valve cover bolts. It's actually easier to do the valve cover gasket job than to change the #6 spark plug! ") 
__________________
"Wise men talk because they have something to say; fools, because they have to say something." - Plato 2013 Cosmic Blue 5spd Evo X GSR 2006 Galaxy Gray 6MT RX-8 (sold) 2006 Steel Gray WRX TR (sold) 1996 Brilliant Red SVX L (sold)
|
|
#6
03-30-2006, 11:02 AM
|
||||
|
||||
|
I have done the right side rocker cover and all the spark plugs. The #5 plug was not that hard. See...
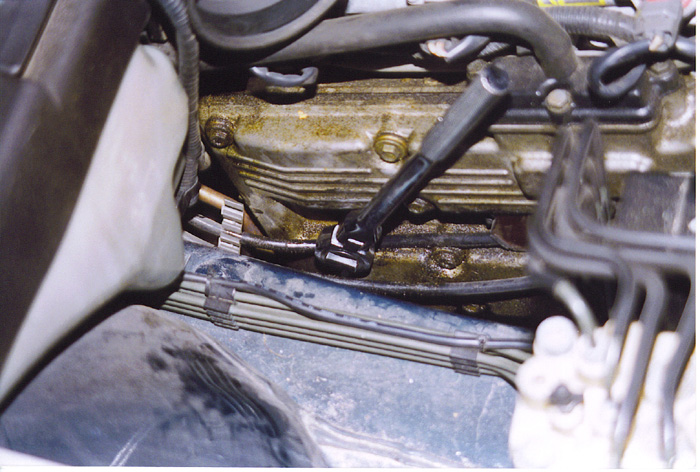 The key is to have a good long flex head 3/8 ratchet. Once I had the air box and battery out of the way these are the only tools I used to change the spark plugs. 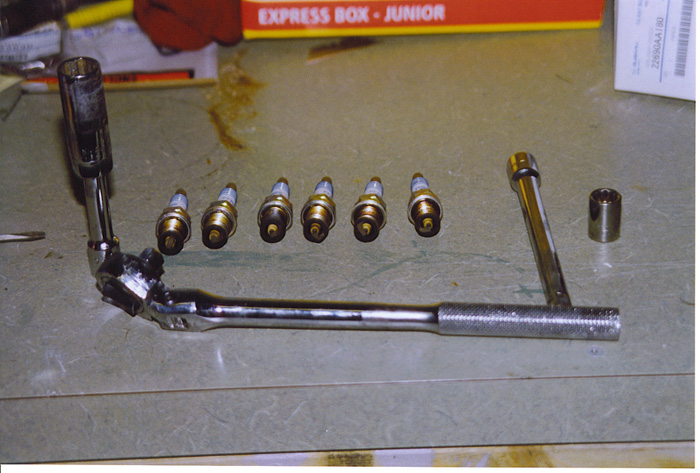 Took only about 1 hour. Steve P.S. Now the # 6 was a little hard because you have to go thru the wheel house with a extension. a nice 10" works good, or a 3" and 6" work too. ***now fixed***
__________________
92 SVX AWD 130,000 w/ rebuilt SVX 4.11 97 Audi A4 1.8T (Daily Driver) 03 Ford Expedition(hers) SVXepidia SVX information warehouse Are you in? My Old Locker A 4.11 Founding Father "Tranny #6" I really need a manual Reading IX [SIGPIC][/SIGPIC] Ya I was there
Last edited by SVX-FF; 03-30-2006 at 08:23 PM.
|
|
#7
04-23-2006, 04:00 PM
|
||||
|
||||
|
Quote:
thanks, -Pavan Last edited by pavanbabut; 04-23-2006 at 04:05 PM.
|
|
#8
04-23-2006, 06:48 PM
|
||||
|
||||
|
Valve cover gaskets
Its funny that this thread about replacing the valve cover gaskets was here the same time I replaced mine. Its true that it is a 5 difficulty out of 10. The rear bolts give you the most trouble and you will spend the most time getting those off and on. I took off the undercarriage cover and tighten some from the bottom as well. And if you are thinking of replacing the spark plugs this is the time to do so because you will now have much more room to do so and it will take less then 5 minutes a plug to exchange them. I had the Bosch plugs and replaced them with the NGK iriidiums, and while I was there I replaced the knock sensors as well, and it runs much better, as well as idleing better. It idles like it isn't even running. I can't wait to climb a hill at full throttle and not smell burning oil at the end.
__________________
96 Red SVX 96,000 miles 02 Toyota Highlander 02 Nissan Altima 04 VW Beetle GLS
|
|
#9
04-23-2006, 08:00 PM
|
||||
|
||||
|
Quote:
Here is a list to do both sides. The top three parts are for the driver side and you only need 10 of the washers, 4th item. The last three are for the passenger side.  There should be 20 washer not the default of 16. Steve
__________________
92 SVX AWD 130,000 w/ rebuilt SVX 4.11 97 Audi A4 1.8T (Daily Driver) 03 Ford Expedition(hers) SVXepidia SVX information warehouse Are you in? My Old Locker A 4.11 Founding Father "Tranny #6" I really need a manual Reading IX [SIGPIC][/SIGPIC] Ya I was there
Last edited by SVX-FF; 04-24-2006 at 12:52 PM.
|
|
#10
04-23-2006, 08:12 PM
|
||||
|
||||
|
Thanks Steve.. will order them this weekend. I am getting very horrible mileage, whtelse do you think I can change at the sametime and have some better fuel efficiency??
thanks, -Pavan
|
|
#11
04-24-2006, 12:46 PM
|
||||
|
||||
|
Quote:
__________________
David B. SVXipedia @ SVX-IW.COM -- SVX Information Warehouse 2.0 coming...eventually! Ebony 1992 SVX LS-L 5 spd Koni/GC Stebro 187k miles RIP (Rust In Pieces) 1993 SVX 5 spd Koni/GC Stebro Polyurethane bushings still available!
|
|
#12
04-20-2006, 07:49 PM
|
||||
|
||||
|
Quote:
.BTW I still have to order the parts, but not sure from where. Two places are listed over here to order. Which one is the better one, I am not bothered about the price, but I need one which is good and lasts longer. What parts should I have to order to change only on one side (driver's side) and do you think its a good idea to replace spark plugs too at the same time? -Pavan Last edited by pavanbabut; 04-20-2006 at 08:29 PM.
|
|
#13
04-21-2006, 10:31 AM
|
|||
|
|||
|
chiketd, that pic of the exposed camshafts is beautiful! Great write up, so good i may just attempt it on my own! Oh is there a special grease that should be applied when reinstalling the new seals (rubber gaskets essentially right?)
|
|
#14
04-21-2006, 10:40 AM
|
||||
|
||||
|
Quote:
__________________
"Wise men talk because they have something to say; fools, because they have to say something." - Plato 2013 Cosmic Blue 5spd Evo X GSR 2006 Galaxy Gray 6MT RX-8 (sold) 2006 Steel Gray WRX TR (sold) 1996 Brilliant Red SVX L (sold)
|
|
#15
04-21-2006, 12:48 PM
|
|||
|
|||
|
Quote:
|
 |
|
|


 Hybrid Mode
