
Live Chat!
SVX or Subaru Links
Old Lockers
Photo Post
How-To Documents
Message Archive
SVX Shop Search
|
SVX Network Forums Live Chat! SVX or Subaru Links Old Lockers Photo Post How-To Documents Message Archive SVX Shop Search |
IRC users: |
|
#1
 02-06-2008, 06:19 PM
|
||||
|
||||
|
poslished intake manifold pictures...
Well fellas, sometimes when I get bored, I get a little crazy. On my probe I hd bunch of polished stuff, and I really like the look of it. I'm trying to decide whether or not to leave this manifold polished, or to chrome it. Polished looks GREAT, but it's very high maintenance. Chrome also looks very great, but costs more, and I don't have the satisfaction of knowing that I did it myself. Also, when you chrome something, it just takes on whatever surface is there to begin with, so if I DO decide to chrome, I'll still need a finish like this anyways. I am a very hands-on kind of guy, so I get a good feeling when I get something done and it turns out better than I expected. Once I get it all done, I'll make my final decision on which route to take.
That said, he are some photos of a spare IM that I recently purchased for just this purpose. The pictures kind of glare, (duh, it's polished) but if you bear with me, it'll all be worth it. Here is the side that has not been done. 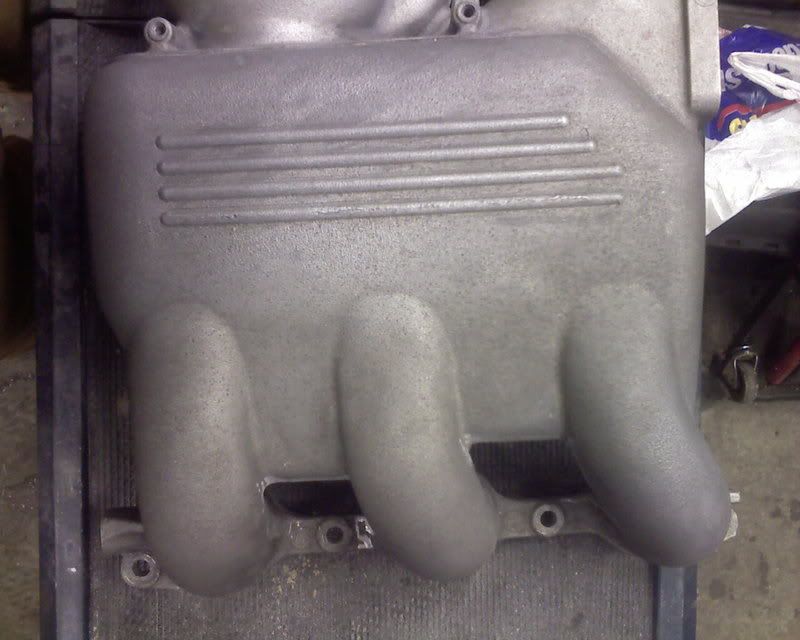 Cleaning up and deburring some casting marks, smoothing everything out so it has good curves. 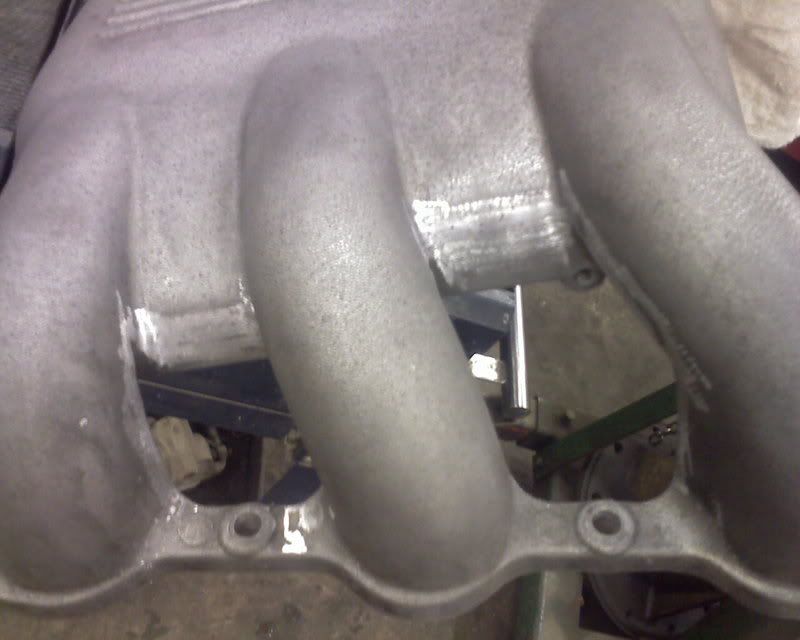 More of the same... 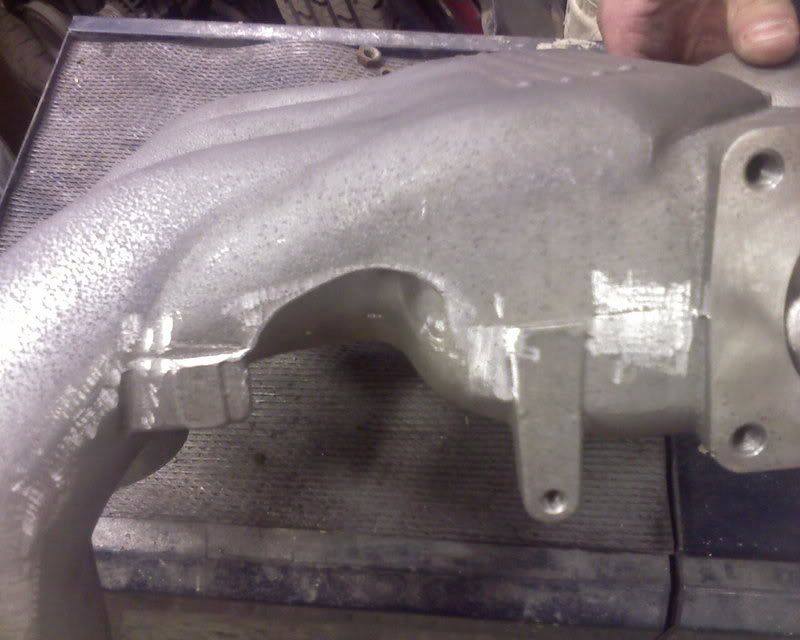 What it looks like when it's done. Well... done-ish. There is some final polishing left. 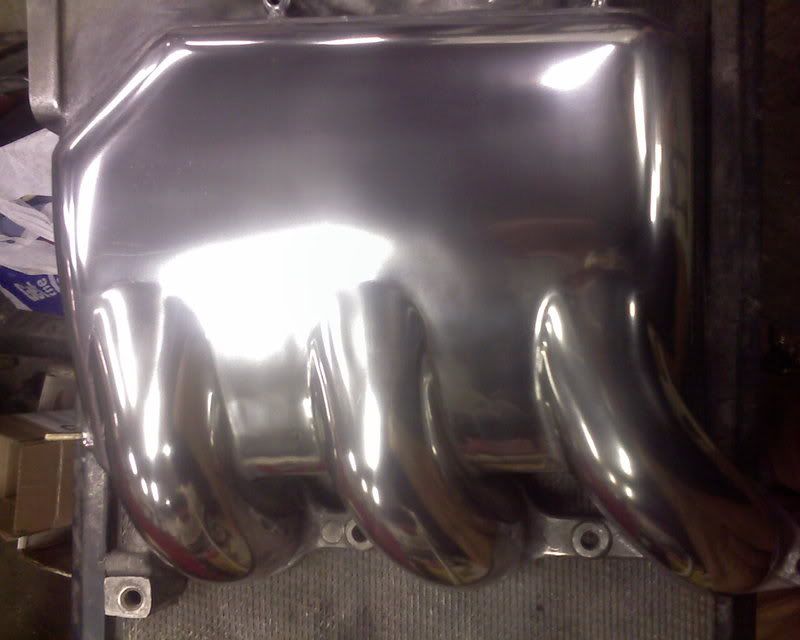 Before and after.  Another shot. 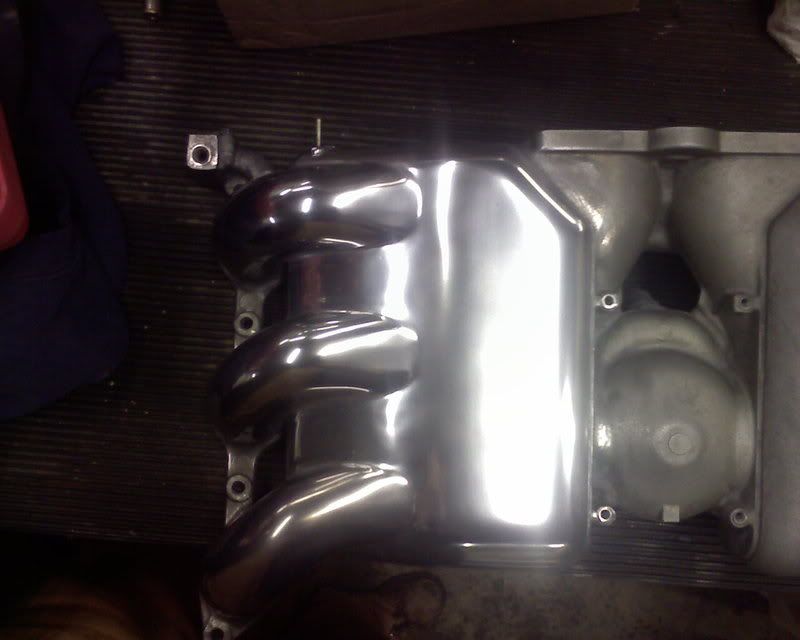 Here's a decent front shot. 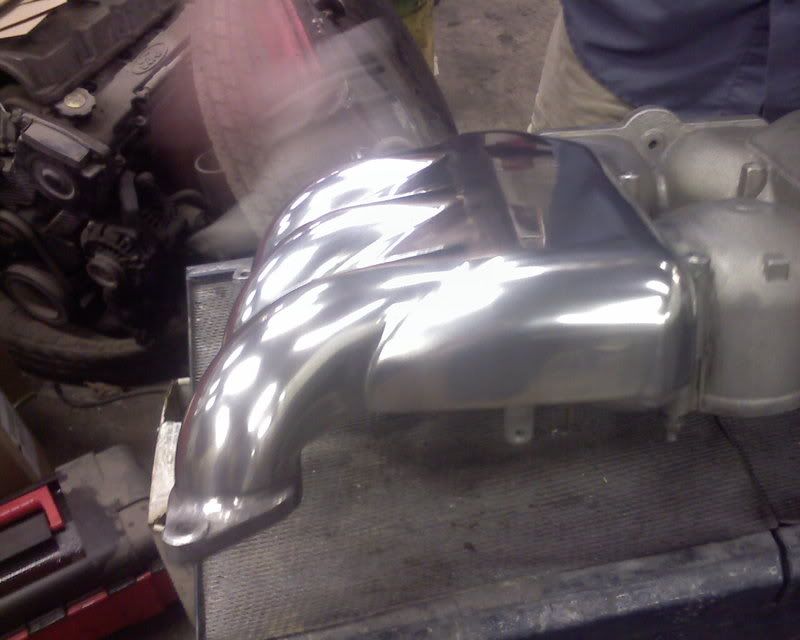 So, curious to know what you all think. I for one, like how it looks, and just may decide to put this on the car when I do some maintenance things come springtime. Can't wait to get it all done though, and then sit back and take a look at it. Also, I hope the pictures work, this is the first I've posted pictures here in a while! Enjoy. Also, here is a picture of the probe's enginebay all fingerprinted and dirtied up, but it at least lets you know what I'm talking about. 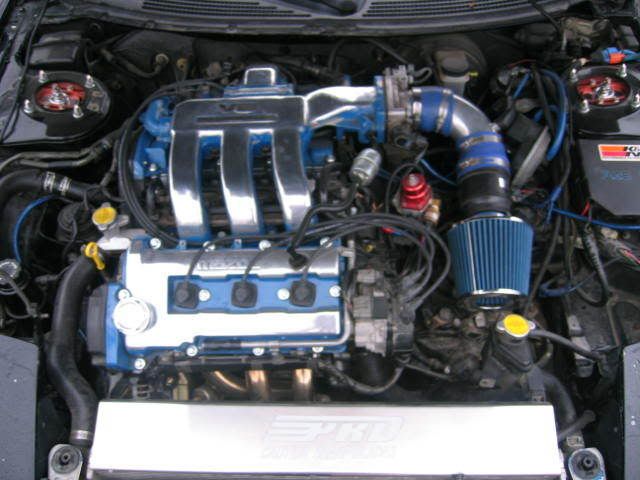 That's that!
__________________
Jesus is the remedy 2015 Expedition EL Ecoboost Ebony Pearl '95 Subaru SVX LSi Home of the Bontrager Works 22mm rear sway bar!! Last edited by Nevin; 02-06-2008 at 06:30 PM. 
|
|
#2
02-06-2008, 06:22 PM
|
|||
|
|||
|
Wow man, thats pretty sharp looking
|
|
#3
02-06-2008, 06:30 PM
|
||||
|
||||
|
I think polished is a good look. I had thought about doing the same for mine.
Edit: The only problems I really see is the fact that it would look really odd with the plastic garnish and the engine cover.
__________________
1991 SVX L JDM Last edited by Mike621; 02-06-2008 at 06:34 PM.
|
|
#4
02-06-2008, 06:33 PM
|
||||
|
||||
|
It would just make it seem so... VIP, I think. Which I like!
The probe has a blue thing going on under the hood, but the Subaru is going to be shiny, or black. I think it will look good once I get things how I'd like!
__________________
Jesus is the remedy 2015 Expedition EL Ecoboost Ebony Pearl '95 Subaru SVX LSi Home of the Bontrager Works 22mm rear sway bar!!
|
|
#5
02-06-2008, 06:37 PM
|
|||
|
|||
|
How many hours did it take for that half? It looks great btw!
__________________
"They that can give up essential liberty to obtain a little temporary safety deserve neither liberty nor safety." Benjamin Franklin blk 92' LSL w/ average mods pics here http://s306.photobucket.com/albums/nn277/yourconfused/ Cash68: "Hmm, I wouldn't brag about beating Escorts. That's like saying you tricked a retarded person."
|
|
#6
02-06-2008, 06:42 PM
|
||||
|
||||
|
Quote:
I'm thinking of ways to overcome that myself. The middle piece will look fine, I think, but the grey of the H-6 cover... Hmm, it's hard to say. I'll think of something. I could just sand smoothe it and paint it chrome?
__________________
Jesus is the remedy 2015 Expedition EL Ecoboost Ebony Pearl '95 Subaru SVX LSi Home of the Bontrager Works 22mm rear sway bar!!
|
|
#7
02-06-2008, 07:33 PM
|
||||
|
||||
|
What is the process of polishing it and how long did that take to do? It does look good.

__________________
. Earl .... ... .... ><SVX(*> Subaru Ambassador [COLOR=silver]1992 Tri Color L[/COLOR] ~45K (06/91) #2430 1992 Dark Teal LS-L ~184K (05/91) #0739 1992 Claret LS-L ~196K (05/91) #0831 1992 Pearl LS-L ~103K (06/91) #1680 1992 Pearl LS-L ~151K (06/91) #2229 1992 Dark Teal LS ~150K (07/91) #3098 (parts car) 1992 White LS-L ~139K (08/92) #6913 1993 25th AE ~98K (02/93) #164 1993 25th AE ~58K (02/93) #176 1993 25th AE ~107K (02/93) #215 1993 25th AE ~162K (02/93) #223 1994 Laguna Blue Pearl LSi ~124K (1/94) #2408 1994 Laguna Blue Pearl LSi ~144K (10/93) #1484 1994 Laguna Blue Pearl LSi ~68K (10/93) #1525 1994 Barcelona Red LSi ~46K (02/94) #2624 1994 Pearl LSi ~41K (12/93) #1961 1995 Bordeaux Pearl LSi ~70K (02/95) #855 1996 Polo Green LSi ~95K (03/96) #872 1997 Bordeaux Pearl LSi ~55K (08/96) #097 2003 Brilliant Red LS1 Convertible ~29K (04/03) #8951 1999 Magnetic Red LS1 Coupe ~33K (04/99) #6420 My Email | Old Locker | New Locker | Picture of 15 of the 19
|
|
#8
02-06-2008, 08:07 PM
|
||||
|
||||
|
That sir, is confidential...
Ha! Yeah right. I use pneumatic tools like a die grinder, dual action 6" sander, uhh..drill? Basically, the concept is start with a coarse grit- something like 40 grit, and get everything smoothe. Then go to 80 grit, then 180, 220, 300, 400, 600, 600 wetsand, 800, 800 wetsand, 1000 dry/wet, 1200, 1500, 2000, 3000, and finally polish it with a good aluminum polish and sit back and admire your work. I also have 4" Chicago Pneumatic buffer that works WONDERS and my detailing business recently started using Britemax products. They have an aluminum cleaner that works awesome, and then a aluminum shine that really are VERY hard to beat. That's what I use, everytime. The most IMPORTANT thing is to take your time, espescially if it's your first time. Make sure that everything is smoothe and free of grit marks before you go on to the next step. However, the nice part is that once you get to a certain point and you see marks in the finish, you can always go back and knock it down again. When I first started I went to 1000 grit to see what kind of blemishes were in it still, then went back down to 180 to get them out. The surface is very easy to work with, but you just have to make sure not to be too aggressive, or you'll be going back down and dong it later. This half of the manifold took me about..5 hours maybe? Probably the longest I've spent on a project yet, but I would also say that it is far and away the best finish I have yet done. I imagine that if I did an entire one at one sitting and had all the things I needed (and some refreshing Mt. Dew) I could probably knock one out in about 6 hours. That's a long time, you might say. I say... you can never spend too long doing something the right way!
__________________
Jesus is the remedy 2015 Expedition EL Ecoboost Ebony Pearl '95 Subaru SVX LSi Home of the Bontrager Works 22mm rear sway bar!!
|
|
#10
02-06-2008, 08:17 PM
|
||||
|
||||
|
Quote:
__________________
Jesus is the remedy 2015 Expedition EL Ecoboost Ebony Pearl '95 Subaru SVX LSi Home of the Bontrager Works 22mm rear sway bar!!
|
|
#11
02-06-2008, 08:30 PM
|
||||
|
||||
|
That's incredible. Your work is top notch and the manifold itself is just a good-looking piece.
__________________
"That which can be asserted without evidence can be dismissed without evidence." '92 Dark Teal SVX LS-L, >146,000m 3 pedals, 5 speeds., restoration underway. 2012 Honda Insight, slow but cute. 
|
|
#12
02-06-2008, 08:40 PM
|
||||
|
||||
|
Quote:
Thank you very much. Also thank you to others who have left feedback. Kinda makes me feel all warm and fuzzy inside... hahha Also, I will do it for others if they're interested. I've done plenty of probe stuff in the past for others.
__________________
Jesus is the remedy 2015 Expedition EL Ecoboost Ebony Pearl '95 Subaru SVX LSi Home of the Bontrager Works 22mm rear sway bar!! Last edited by Nevin; 02-06-2008 at 08:44 PM.
|
|
#13
02-06-2008, 08:58 PM
|
||||
|
||||
|
That looks awesome. I've though about chroming mine. The only thing I might have done differently is leave the four ridges on the flat part, and paint them to match the car body colour. Just for some contrast.
__________________
Chris 92 Ebony Mica LS-L "A Rolling Restoration": 223,250 KM - Sleeping 2007 STi 6MT, Stance GR+ coilovers, PWR Rad, JDM hood badge, svxfiles 6000K HIDs, JDM Clear Corners, $15/15 min mod, $20/20 min mod, Energy Swaybar Bushings, Hella Supertones horns, Gold STi BBS rims, Group A lightweight crank pulley, A/C system removed, Custom header-back exhaust, Hybrid carbon/metal rear sway bar, restored headlights with CCFL halos 2008 Subaru Legacy Spec B - Diamond Grey Metallic - Sold 2020 Ram 1500 Longhorn - Red Pearl
|
|
#15
02-07-2008, 10:16 AM
|
||||
|
||||
|
Looks awesome
Theres a company called Alsa that makes all kinds of funky paints and finishing products, Im quite sure they have chrome spraypaint...if you wanted to have your engine cover match, that is
__________________
R.I.P Cool Signature. You're gone but not forgotten. I mean, sure, I kindof don't remember some of the finer details..but I remember you were funny, and at one point you said spaghetti in Dutch....but definantly not forgotten
|
 |
|
|


 Linear Mode

