
Live Chat!
SVX or Subaru Links
Old Lockers
Photo Post
How-To Documents
Message Archive
SVX Shop Search
|
SVX Network Forums Live Chat! SVX or Subaru Links Old Lockers Photo Post How-To Documents Message Archive SVX Shop Search |
IRC users: |
|
#1
 02-27-2009, 07:11 PM
|
|||
|
|||
|
Gasket Problem?
When changing the oil in my 96 SVX, I noticed something leaking at the bottom of the ....thats my question, I don't know what part this is. As you face the front of the engine, its that black plastic cover thats on the left, immediately in back (towards the firewall, about 2 inches behind the radiator) of the radiator. It extends from the top of the engine, to the bottom. A similar type of cover is on the right hand side which i think is the cover for the timing belt.
Anyway, at the bottom of this plastic thing (you only see the bottom of it with the plastic shroud removed from under the car to get to the oil filter) part of a rubber gasket is visible, and its leaking something. Sorry for the very unclear description. Hopefully someone will read this and think "hey, I had that exact same problem and its the ________ (fill in part here)". Thanks. Larry 
|
|
#2
02-27-2009, 08:02 PM
|
||||
|
||||
|
Re: Gasket Problem?
Sounds like either your cam seal or cam plug is leaking.
__________________
Seth 94' Barcelona Red w/ Tricoat black 2-tone AWD Ls -Sold Mods:AWD conversion/4.44 swap by Budfreak, Custom red interior lights, Custom Satin black dash, Power mode switch, Cold air intake, Permecool tranny filter,Sony xplode 10" sub, Sony xplode 1000w amp, Blitz in-line driver, DDM Tuning 6000k HID's, New paint job/body work by me, 97' Grill, QC shift kit, 17'' MB Motoring rims, 15&20 min mod, front & rear urethane swaybar bushings, Custom fiberglass sub box, Custom red led a/c control unit, perrin lightweight crank pulley, Black wrinkle finish powdercoated intake manifold w/ clear hoses , 02' outback heated/power black leather seats Soon to come:Fiberglass hood, upholster ALL suede to black leather Past subies: 92' Pearl White/black top LS-L-SOLD 96' Legacy Outback-TOTALED 99' Legacy Outback Limited 30th anniversary edition-TOTALED 98' Forester L -Totaled Other toys: 99' Forester S -WRX brake upgrade, soon an 04 wrx motor swap 06' B9 Tribeca-Stock 1982' Yamaha xj650 Maxim Mods: work in progress
|
|
#3
02-28-2009, 04:13 AM
|
||||
|
||||
|
Re: Gasket Problem?
Agreed....
You should re-place both cam seals and the front crank seal...theey are only about $7 each...but you have to pull the timing belt to do them, so it'd be a good time to replace it too.
__________________
Huck Subaru Ambassador 92 SVX LS-Tour Magnaflow Exhaust, 5-Spd-AWD  88 XT6 AWD 5-Speed "Bride of FrankenWedge" 15 Impreza Premium Sedan 15 Crosstrek XV 5-Speed My 5-Speed "How-To" Write-up 1976 Pontiac Firebird Formula Current Count of Subaru's Owned.... "70"
|
|
#4
02-28-2009, 07:04 AM
|
||||
|
||||
|
Re: Gasket Problem?
I think what youre seeing is the timing cover seal, when oil seeps from your cam seals it pools at the bottom of your timing cover and leaks out from there. Timing belt replacement is a cakewalk.... but to remove your camshaft pulleys you have to use a special tool, or your old timing belt wrapped around them and secured on part of the engine, to keep them from turning when you remove the bolt. You can do the whole job with a basic socket set pretty much.
__________________
Chris "A person convinced against their will, is of the same opinion still"  New?? Find the downloadable SVX Online Service Manual Here New?? Find the downloadable SVX Online Service Manual Here RECOMMENDED READING for newer SVX owners Here some cool info if not fully accurate. RECOMMENDED READING for newer SVX owners Here some cool info if not fully accurate.
|
|
#5
02-28-2009, 08:59 AM
|
||||
|
||||
|
Re: Gasket Problem?
Quote:
__________________
'93 Legacy LS (will last longer than the cockroaches) '94 SVX LSi
|
|
#6
02-28-2009, 01:07 PM
|
|||
|
|||
|
Re: Gasket Problem?
OK, so the suggestion is that I replace the timing belt at the same time I replace these seals. How hard is to replace the timing belt? I had the dealer do it at 60K miles, and always thought that it was fairly difficult. Are there any clear instructions anywhere? Thanks.
Hey, RedLighteningSVX, mine looks just like yours. Larry
|
|
#7
02-28-2009, 02:01 PM
|
||||
|
||||
|
Re: Gasket Problem?
[QUOTE=elemgee; How hard is to replace the timing belt? I had the dealer do it at 60K miles, and always thought that it was fairly difficult. Are there any clear instructions anywhere? Thanks.
Larry[/QUOTE] Not hard at all. The alignment of the alignment marks can be seen by clicking on the How-to at top right of this page. Then a click on "engine" will take you to another page. Carefully hidden under "cambelt" is the alignment information for the timing belt! I would suggest turning the crank and lining everything up whenever possible before removing the old timing belt. You need to end up with the belt in that position when reinstalling it. The new belt will come with the alignment marks and some more stuff written on it! Don't know if it matters, but I put the belt on so I an read the words... not reversed. If you make it to the cam shaft seals... both sides of the engine, of course, the timing belt will already be removed and put in the trash! Chances are it will have a bit of oil soaking going on, regardless of the age of the belt. There is a Hydraulic tension idler contraption that must be removed, re-compressed, and reinstalled with the new belt. I use a "big old vise" to re compress the hydraulic unit but it should be done slowly to avoid damage to the unit. I take a small allen wrench and push through small holes to keep it compressed until reinstalling that piece back on the engine. Notice the way the hydraulic unit was installed and that will help with putting sliding the allen wrench in correctly so it can be removed after the timing belt is in place. Be sure and get the wrench through all 3 holes while it is compressed in the "big old vise" The way I install the timing belt is to remove the lower idler pully that the belt is pushing against, the smooth one at the bottom... near the center front of the notor and simply lay the timing belt in place, properly aligned at all three alignment marks with the tensioner in place but the allen wrench still in the hydraulic tensioner. Then I reinstall the lower idler pulley that the timing pulley pushes up against the belt. Double check to make sure all alignment marks are correct and pull out the allen wrench! Say, "Thank the Lord" and put the covers back on. You have already, of course, removed both radiator fan units, NOT the radiator, to make the job doable. The right fan unit, pasenger side, can at first seem not that easy, but by taking out the 2 bolts, unpluging the electrical connector, and since the front of the car is already elevated and on jack stands, simply pull that fan unit out the bottom! Most are not aware of some of the simple steps that I learned by trial and error, but you can benefit from this information! As you get into the job, hopefully some of this will make sense to you. Keith  Good luck Last edited by kwren; 03-03-2009 at 03:11 AM.
|
|
#8
02-28-2009, 08:43 PM
|
||||
|
||||
|
Re: Gasket Problem?
Keith's instructions are pretty dead on. I just pulled all that stuff off last night to replace the 4 idler pulleys I hadn't replaced when I did my cam seals in Jan. I did just what he said, except I drained and pulled the radiator, which IMO is easier than pulling the fans off it.
By draining into a clean bucket, it's just removing 4 hose clamps and the two top brackets and the whole thing comes straight out the top giving you tons of clearance to get at the timing belt. If I were doing just the timing belt, removing just the fans is probably fine, but since you're going to need to pull the cam sprockets and do the seals, I'd opt for more space and pull the rad. Regarding pulling the cam sprockets... I wouldn't use a chain wrench. I've had to do that in the past on my WRX because one of the bolts was seized, but it destroyed the sprocket in the process. Use the old timing belt instead to protect the sprocket. Then keep the old belt around in case you ever need to get at those parts again and you don't want to be forced to buy a new belt. Here's an example of using an old belt when retightening the cam sprocket: 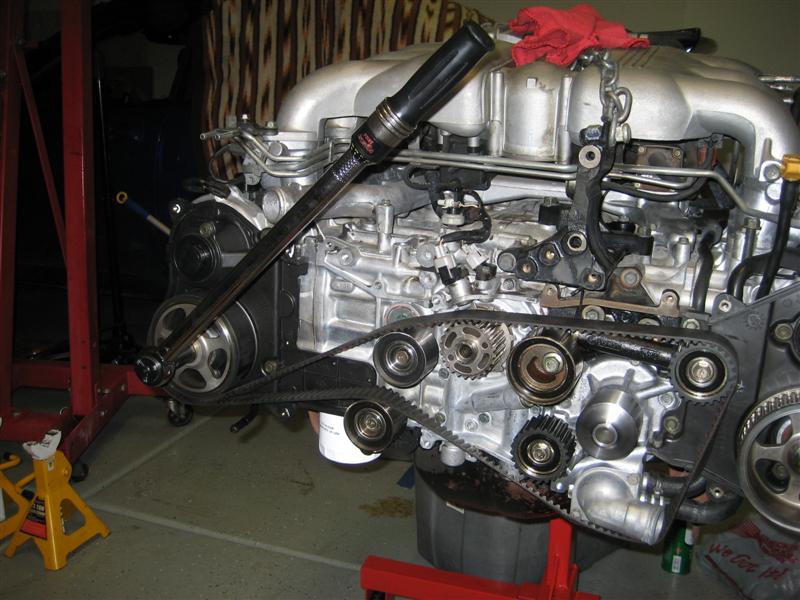 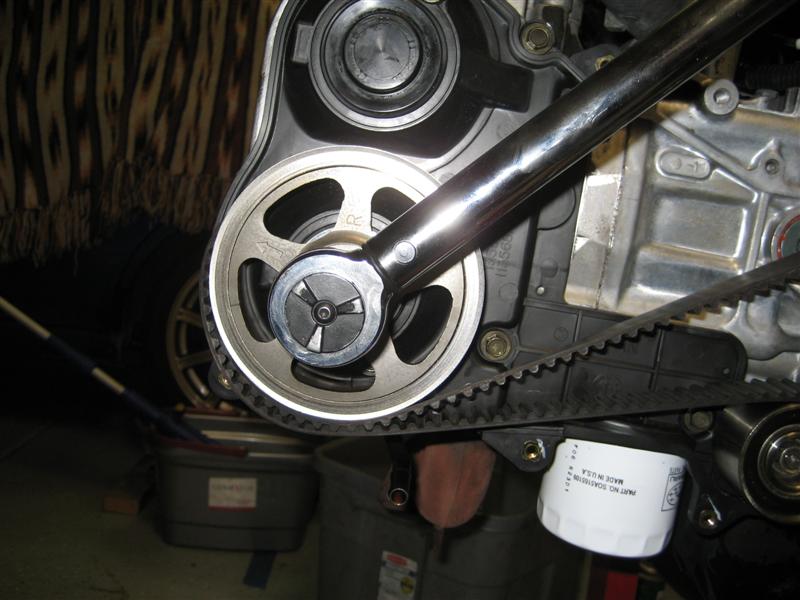 Just reverse the loop for taking off the bolt. And here's the hydraulic tensioner that Keith was talking about, with an allen wrench in there to keep it compressed during installation of the timing belt: 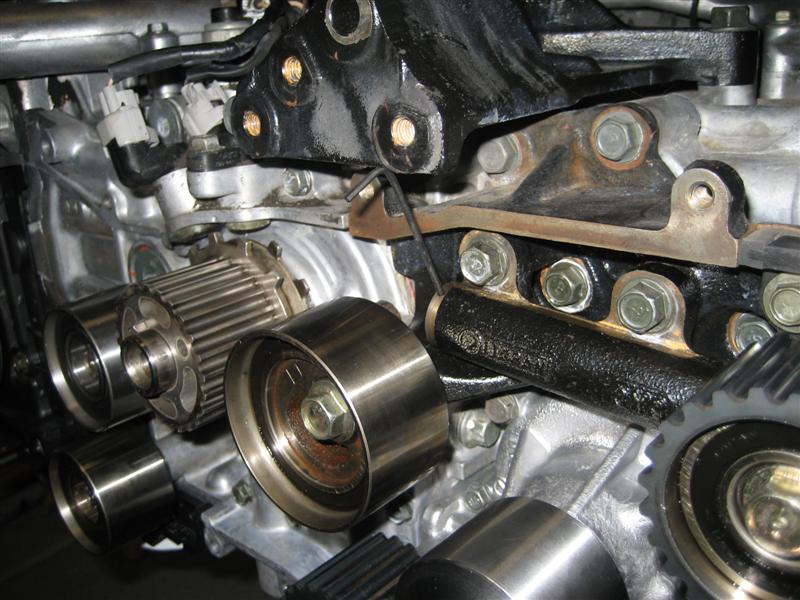 A ton more pics of the front of the motor apart are here in my gallery of pics from my engine resealing job: http://www.seccs.org/gallery/index.p...ne%20Resealing
__________________
3 turbos, 28 cylinders, 96 valves, 18 cams, 1400hp/1600ftlbs: '09 Outback XT / '06 Outback Sedan / '02 WRX / '94 SVX / '01 F-250 SuperDuty Last edited by sperry; 02-28-2009 at 08:45 PM.
|
|
#9
03-02-2009, 11:23 PM
|
|||
|
|||
|
Re: Gasket Problem?
Thanks for the great response and pics. This looks kind of doable. Think I'll give it a try when the weather warms up. The only part I'm not real clear on is use of a vice for the tensioner, but I'll probably figure that out once I get into it.
Larry
|
|
#10
03-03-2009, 02:53 AM
|
||||
|
||||
|
Re: Gasket Problem?
Quote:
__________________
3 turbos, 28 cylinders, 96 valves, 18 cams, 1400hp/1600ftlbs: '09 Outback XT / '06 Outback Sedan / '02 WRX / '94 SVX / '01 F-250 SuperDuty
|
|
#12
03-03-2009, 08:15 AM
|
||||
|
||||
|
Re: Gasket Problem?
Quote:
__________________
Huck Subaru Ambassador 92 SVX LS-Tour Magnaflow Exhaust, 5-Spd-AWD 88 XT6 AWD 5-Speed "Bride of FrankenWedge" 15 Impreza Premium Sedan 15 Crosstrek XV 5-Speed My 5-Speed "How-To" Write-up 1976 Pontiac Firebird Formula Current Count of Subaru's Owned.... "70"
|
|
#13
03-03-2009, 11:45 AM
|
||||
|
||||
|
Re: Gasket Problem?
Quote:
Worst case, you just need to tap it a few times w/ a rubber mallet to unseat it. It's not pressed on in any way. Taking the wheels off is about 100 times more effort.
__________________
3 turbos, 28 cylinders, 96 valves, 18 cams, 1400hp/1600ftlbs: '09 Outback XT / '06 Outback Sedan / '02 WRX / '94 SVX / '01 F-250 SuperDuty
|
 |
|
|


 Linear Mode

