|
Re: Alternator mod mess(inherited problems...)
Quote:
Originally Posted by kjoyes

In other words, rip out the mod and start over from scratch.
Follow the v.4 the instruction found on Manic Electrics site, or in the How-to documents .
Run the alternator plug and AC compressor wires under the intake manifold.
Connect the 2 original 10 gauge wires, attached at the alternator, together.
The two 10 gauge wires run the fans so it its important that they get hooked up or your engine may need a new head gasket. I did this mod for around 50 bucks but it was trial-and- error, so I had to re-buy some supplies Do a search for (alternator mod supplies) and by battery and subwoofer. I would like to express there thanks to svxcess for all his discovery and research on this topic.
|
You don't even have to go that far. You can leave the wires from the alternator plug where they are and not lengthen them. I just did it to get a cleaner, less cluttered look. Just don't zip-tie them to the alternator cables.
The same with the A/C wires. I did not do anything to them at all. I just left them alone. They don't need to be zip-tied to the alternator either. Look closely at the photos.
You don't even have to join the 2 white wires together. With the new battery cable attached, current will follow the path of least resistance (the larger wire)
All that is necessary is to run the new additional 4 gauge wire (with megafuse) from the battery to the alternator charging post. Use solid crimped connections (not soldered) and insulate well. Use the same 4 gauge wires for the ground wires (from the negative battery terminal to frame ground by the battery) and one to engine ground (Use the bolt at the AC compressor bracket.)
Again, it is all about electrical balance. Your ground wiring should at least equal the positive wiring. Your current path is only as good as the weakest link.
Disconnect whatever wires were added to the fusebox or wiring loom. We are really adding a better ground and path for current, not messing with additional circuitry.
I think your main problem is there, along with the badly-designed fuse system.
Running 2 10-gauge wires in parallel electrically increases the wire gauge by 3 sizes. There is a formula for this and it works with any gauge wire. So these 2 wires together equal a 7 gauge wire. Even doubling the 10-gauge, it is too small to match up with the 4-gauge on the other side of the fuse. Current sharing with wires in parallel is pretty iffy, due to varying and unpredictable contact resistance at each wire end termination.

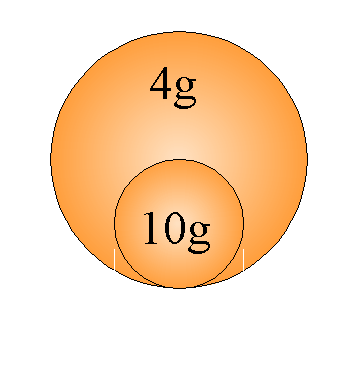
The above image shows the relative difference between 10g and 4g wires (not actual size). You can easily see that doubling the diameter quadruples the cross-sectional area.
The 4 gauge KolossusFleks Kable is the best stuff I have ever found, electrically closer to a 3-gauge. It is super-flexible and can be routed easily (See the 180º turn from the battery terminal to the Megafuse). Every strand is tinned to prevent oxidation and corrosion and reduce resistance.
Available for $1.55 per foot from www.knukonceptzcom
I used the BLACK (actually tranluscent dark smoke) throughout. LINK
.
__________________
.
Subaru Ambassador
1996 Polo Green LSi #216 ..138,100 miles. ..SOLD
JFICX8659TH100216.....Date of Manufacture: November 16, 1995.....
Fuji Heavy Industries..Ōta North Plant....Ōta City,. Gunma Prefecture, Japan
In-Service Date: January 2, 1997
"The Pristine Green Polo Machine”
First Polo Green on the Network
First Clear front turn signals, JDM Alcyone hood emblem, rear panel, and BOXER engine cover on the Network (US) (2000)
First 5000K HID factory fog lights (2007)
First SVX JDM BBS wheels on a USDM SVX (2013)
HID lighting (5000K) for headlight and H3 fog lights, PIAA SuperExtreme 120W high beams, rebuilt EG33 longblock, Cometic head gaskets, Phase II flexplate, AMR aluminum radiator with custom silicone hoses, 160A high-output alternator in aluminum-ceramic coated case, new design alternator wiring upgrade v.4, rare factory headlight protectors, refinished JDM BBS mesh aluminum wheels and custom, polished billet aluminum new hex center caps, LED grille mod, R1 Concepts high-carbon cryo slotted rotors, Akebono ceramic pads, Goodridge S/S braided brake lines, Smallcar Stage 1 shift kit, ThermalTech aluminum/ceramic-coated valve covers, Energy Suspension urethane front & rear swaybar bushings, Bontrager22 rear swaybar with QS Components Chromoly Teflon/Kevlar endlinks, "$15.00/5 minute" suspension mod. Hella Supertone horns, Custom stainless steel exhaust system with 2" headpipes, Magnaflow cats, AeroTurbine AR25 resonator /AWD "Bullet" muffler.
R.I.P. 2010 Subaru Outback Limited 2.5 CVT...338,000 miles. Totaled by a 1,300 lb. COW March 4, 2016  2014 Hyundai Avante Limited ...
178,000 miles. Actually quieter and smoother than the Outback  2007 Mazda Miata MX-5 PRHT...
102,000 miles.
Plenty of parts, service and windshields.  4th Registered Network member —2/21/2001
My NEW locker..I...My Email..I..Wikipedia/SVX .
.
Last edited by svxcess; 07-21-2013 at 09:10 AM.
|